Installing ArgoCD on Kubernetes Cluster with Terraform
There are many tools for handling complex architecture of deploying changes of your applications from the build stage to your cluster, most times the term and process of archiving this is called GitOps only if GitHub is being used as the single source of truth in the scenario.
And out of many of these tools, ArgoCD is one of the best that you can use, it's also open source, and that's what I am writing about here.
Prerequisites:
- A Running Kubernetes Cluster provisioned using terraform
- Kubectl is installed and your kubeconfig file is set too(~/.kube/config).
- Your deployments yaml file in your GitHub repository, you can git clone mine, gitops-argocd
Install Argo CD to your cluster
Using the following terraform code, you can deploy argocd into your existing kubernetes cluster, but before you apply this code using terraform apply --auto-approve, you need to create a folder named argocd and save the below configurations as install.yaml in the argocd folder you just created.
The below argocd configurations is not good for production, because this isn't implementation for HA(High Availability), you can check argocd HA docs to set production-ready config values.
# redis-ha:
#   enabled: true

controller:
  replicas: 1

server:
  replicas: 1
  service:
    type: LoadBalancer

repoServer:
  replicas: 1

applicationSet:
  replicaCount: 1
  # replicaCount: 2
resource "kubernetes_namespace" "argocd" {
  metadata {
    name = "argocd"
  }
}

resource "helm_release" "argocd" {
  name       = "argocd"
  chart      = "argo-cd"
  repository = "https://argoproj.github.io/argo-helm"
  version    = "6.7.11"
  timeout    = "1500"
  namespace  = kubernetes_namespace.argocd.id
  values = [data.template_file.argo-values.rendered]
}

resource "null_resource" "password" {
  provisioner "local-exec" {
    working_dir = "./argocd"
    command     = "kubectl -n argocd-staging get secret argocd-initial-admin-secret -o jsonpath={.data.password} | base64 -d > argocd-login.txt"
  }
}

resource "null_resource" "del-argo-pass" {
  depends_on = [null_resource.password]
  provisioner "local-exec" {
    command = "kubectl -n argocd-staging delete secret argocd-initial-admin-secret"
  }
}

}
Here is the terraform code for the variable used, as well as the provider used here, copy and paste this into your variable.tf file and provider.tf file
variable "eks-name" {
  type    = string
  default = "my-cluster"
}

variable "env" {
  default = "staging"
}
terraform {
  required_version = ">= 1.0"
  required_providers {
    kubectl = {
      source  = "alekc/kubectl"
      version = "2.0.4"
    }
  }
Once you have applied the above terraform codes, Argocd will be deployed in your argocd namespace and load balancer to access argocd server via UI, will be generated too, you can find it by running kubectl get svc -n argocd
Also, the generated password to access your argocd server will be stored in the argocd-login.txt file for you, and you will notice the del-argo-pass null_resource in the terraform code.
What that section of the code does is that, after you have gotten the come-along argocd server password, it's security-wise to delete the secret from our cluster, it's mentioned in the argocd docs too.
Argo CD Application
And here is the Application yaml file, the following yaml will help you create an application on your argocd server.
create application.yaml file and copy the below yaml codes there and apply using kubectl apply -f ./argocd/application.yaml and you are good to go.
apiVersion: argoproj.io/v1alpha1
kind: Application
metadata:
name: argo-test-app
namespace: argocd-staging
spec:
project: default
source:
targetRevision: HEAD
path: dev
directory:
recurse: true
destination:
server: https://kubernetes.default.svc
namespaces: default
syncPolicy:
syncOptions:
- CreateNamespace=true
automated:
prune: true
selfHeal: true
What the Application fields mean:
source.repoURL: the Git repository holding your deployment manifests.source.targetRevision: HEAD: track the latest commit.source.path: dev: the folder inside the repo for this environment.destination.server: https://kubernetes.default.svc: the target cluster. For the local cluster this is the default.destination.namespace: default: the namespace to deploy into.syncPolicy.automated.prune: true: ArgoCD deletes resources that are removed from Git.syncPolicy.automated.selfHeal: true: ArgoCD reverts drift caused by manual changes.syncPolicy.syncOptions.CreateNamespace=true: creates the destination namespace if it does not exist.
If everything goes well, your application will sync and deploy in minutes. If the repo is private, you will see an error like this instead.
ComparisonError
rpc error: code = Unknown desc = error creating SSH agent: "SSH agent requested but SSH_AUTH_SOCK not-specified"
So let's fix this.
Connect Argocd with private repo manually or declaratively
👉 Step 1 - Generate ssh keypairs
You will need to generate a passwordless SSH key pair, you can use either -P "", or using -N '' by, leaving the strings empty it will create our keypairs without the need for CLI interaction.
ssh-keygen -t ed25519 -C blog.saintmalik.me -N '' -f argo
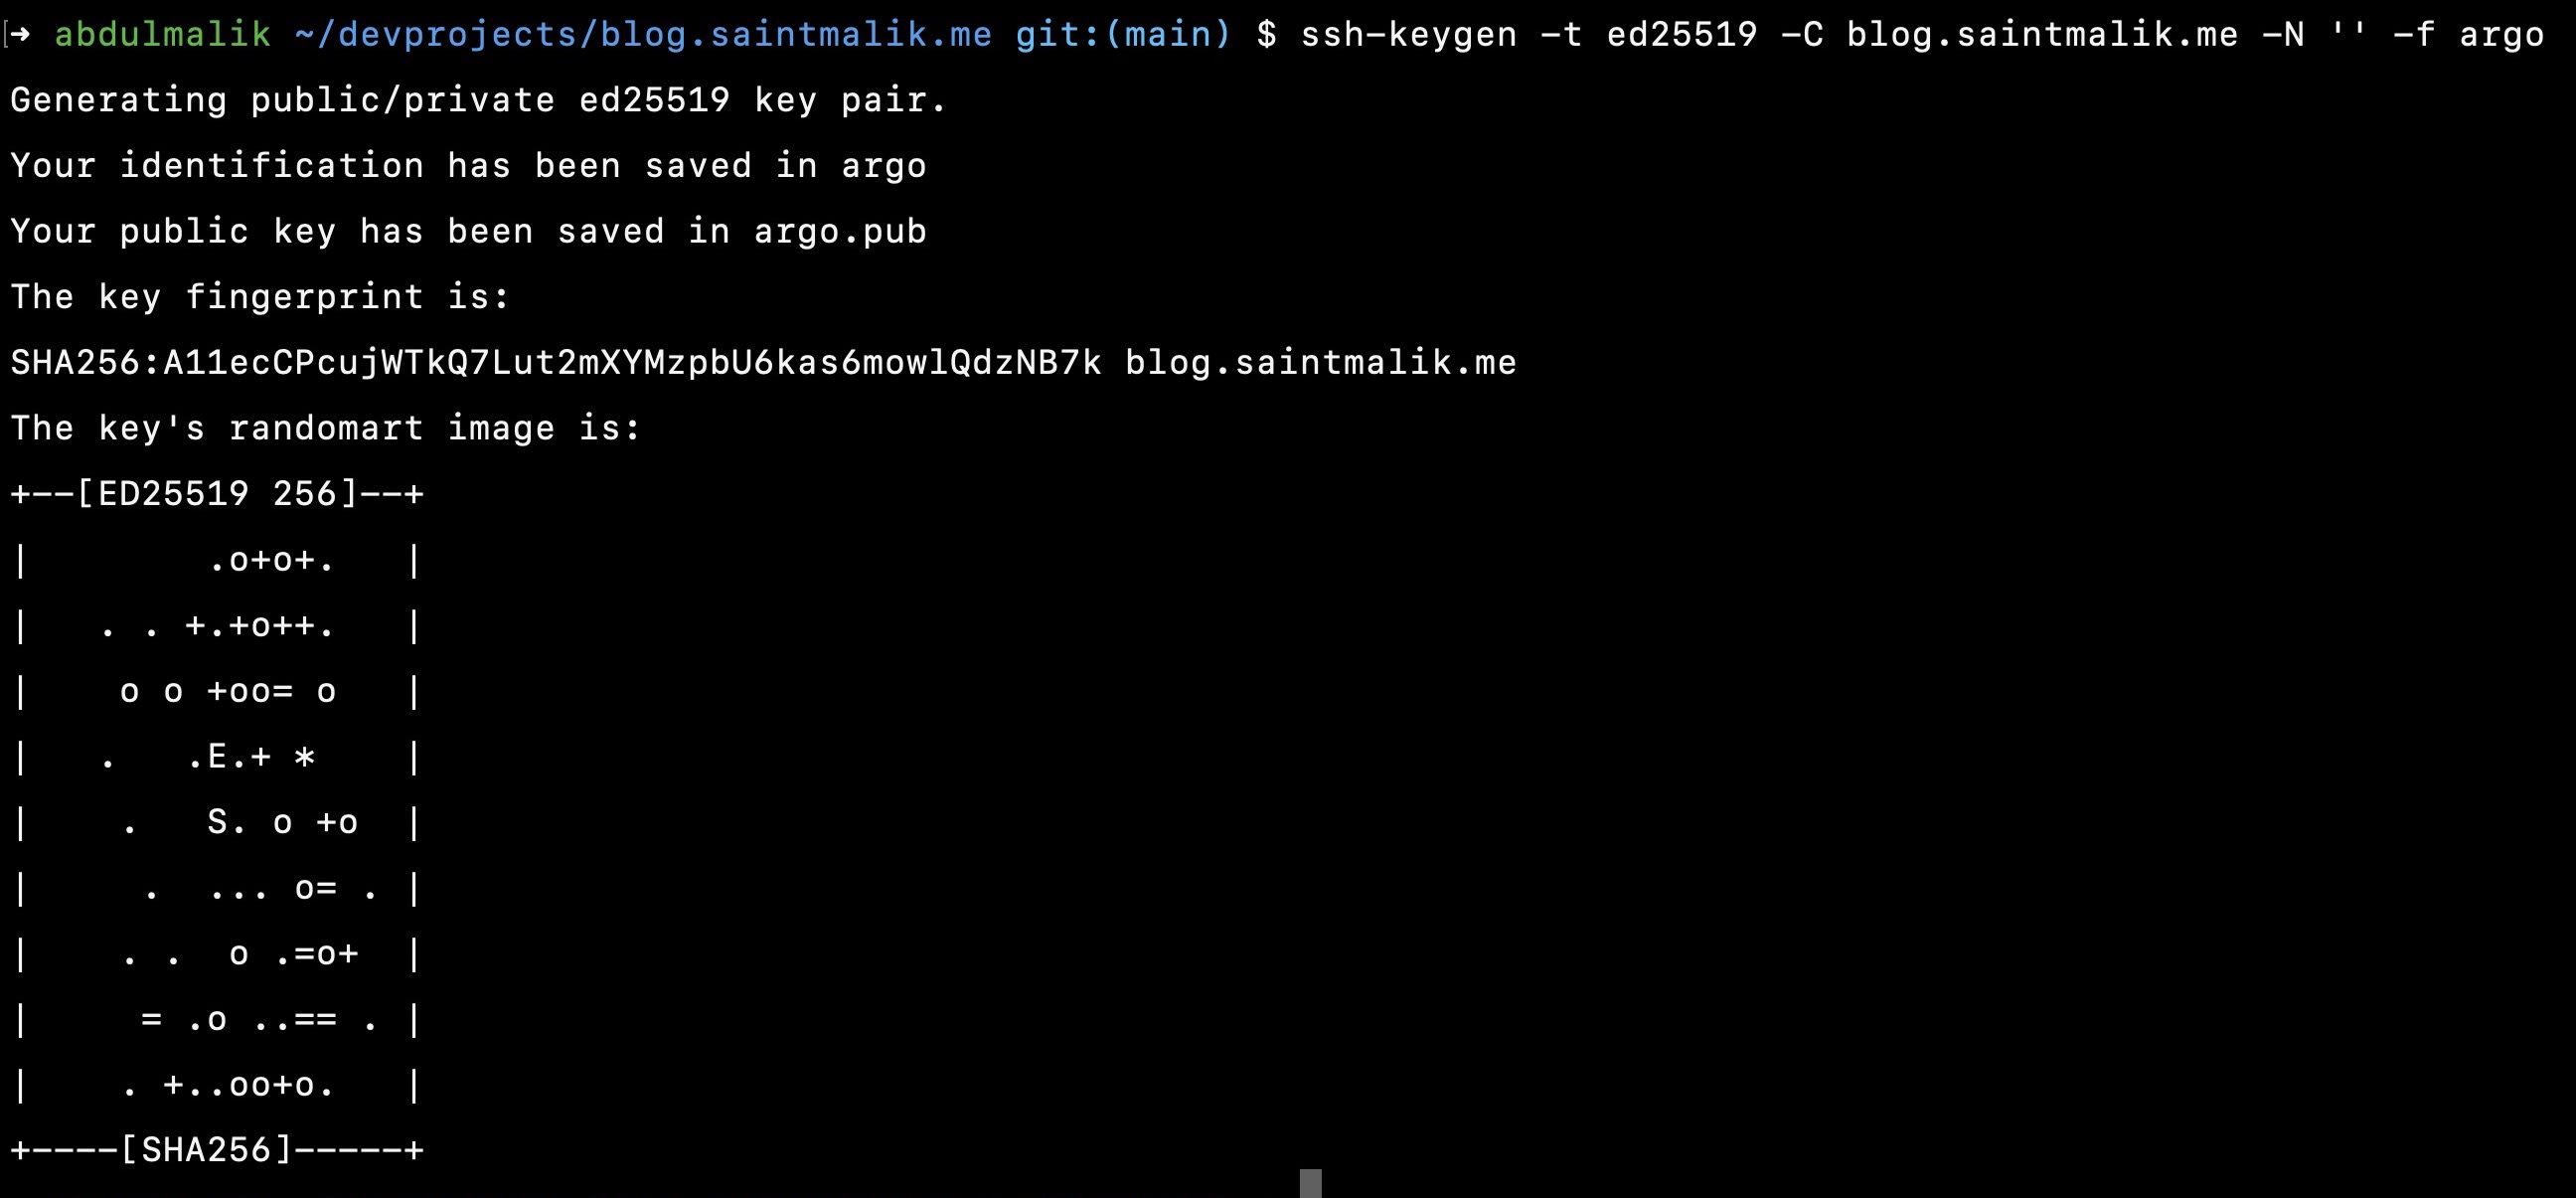
This will generate two files for you, argo which holds the private ssh key and argo.pub which holds the public ssh key
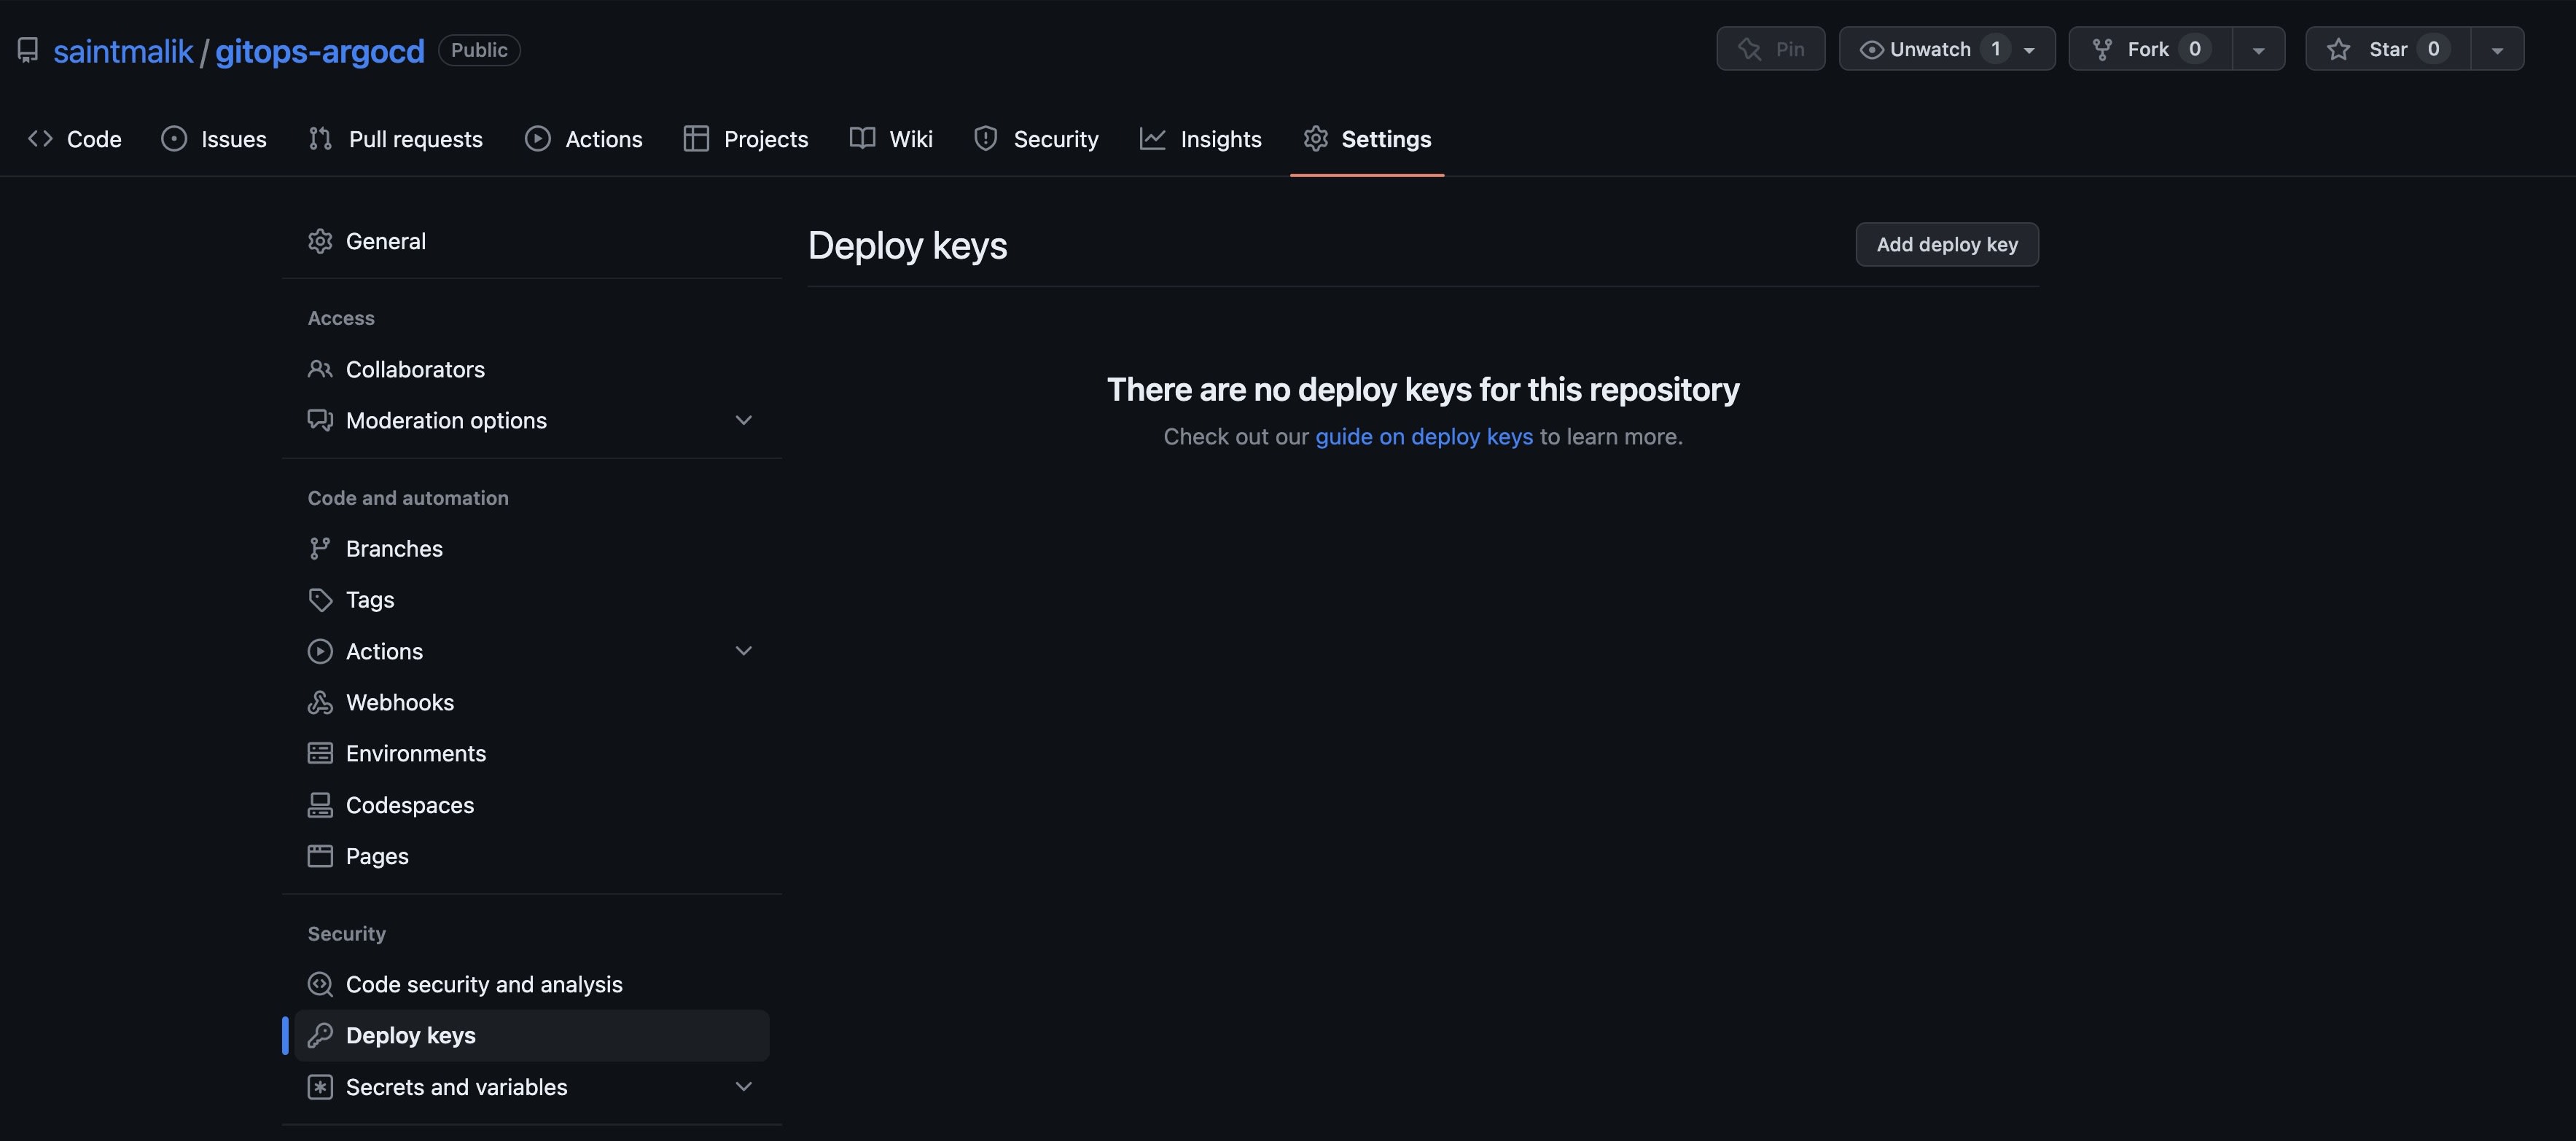
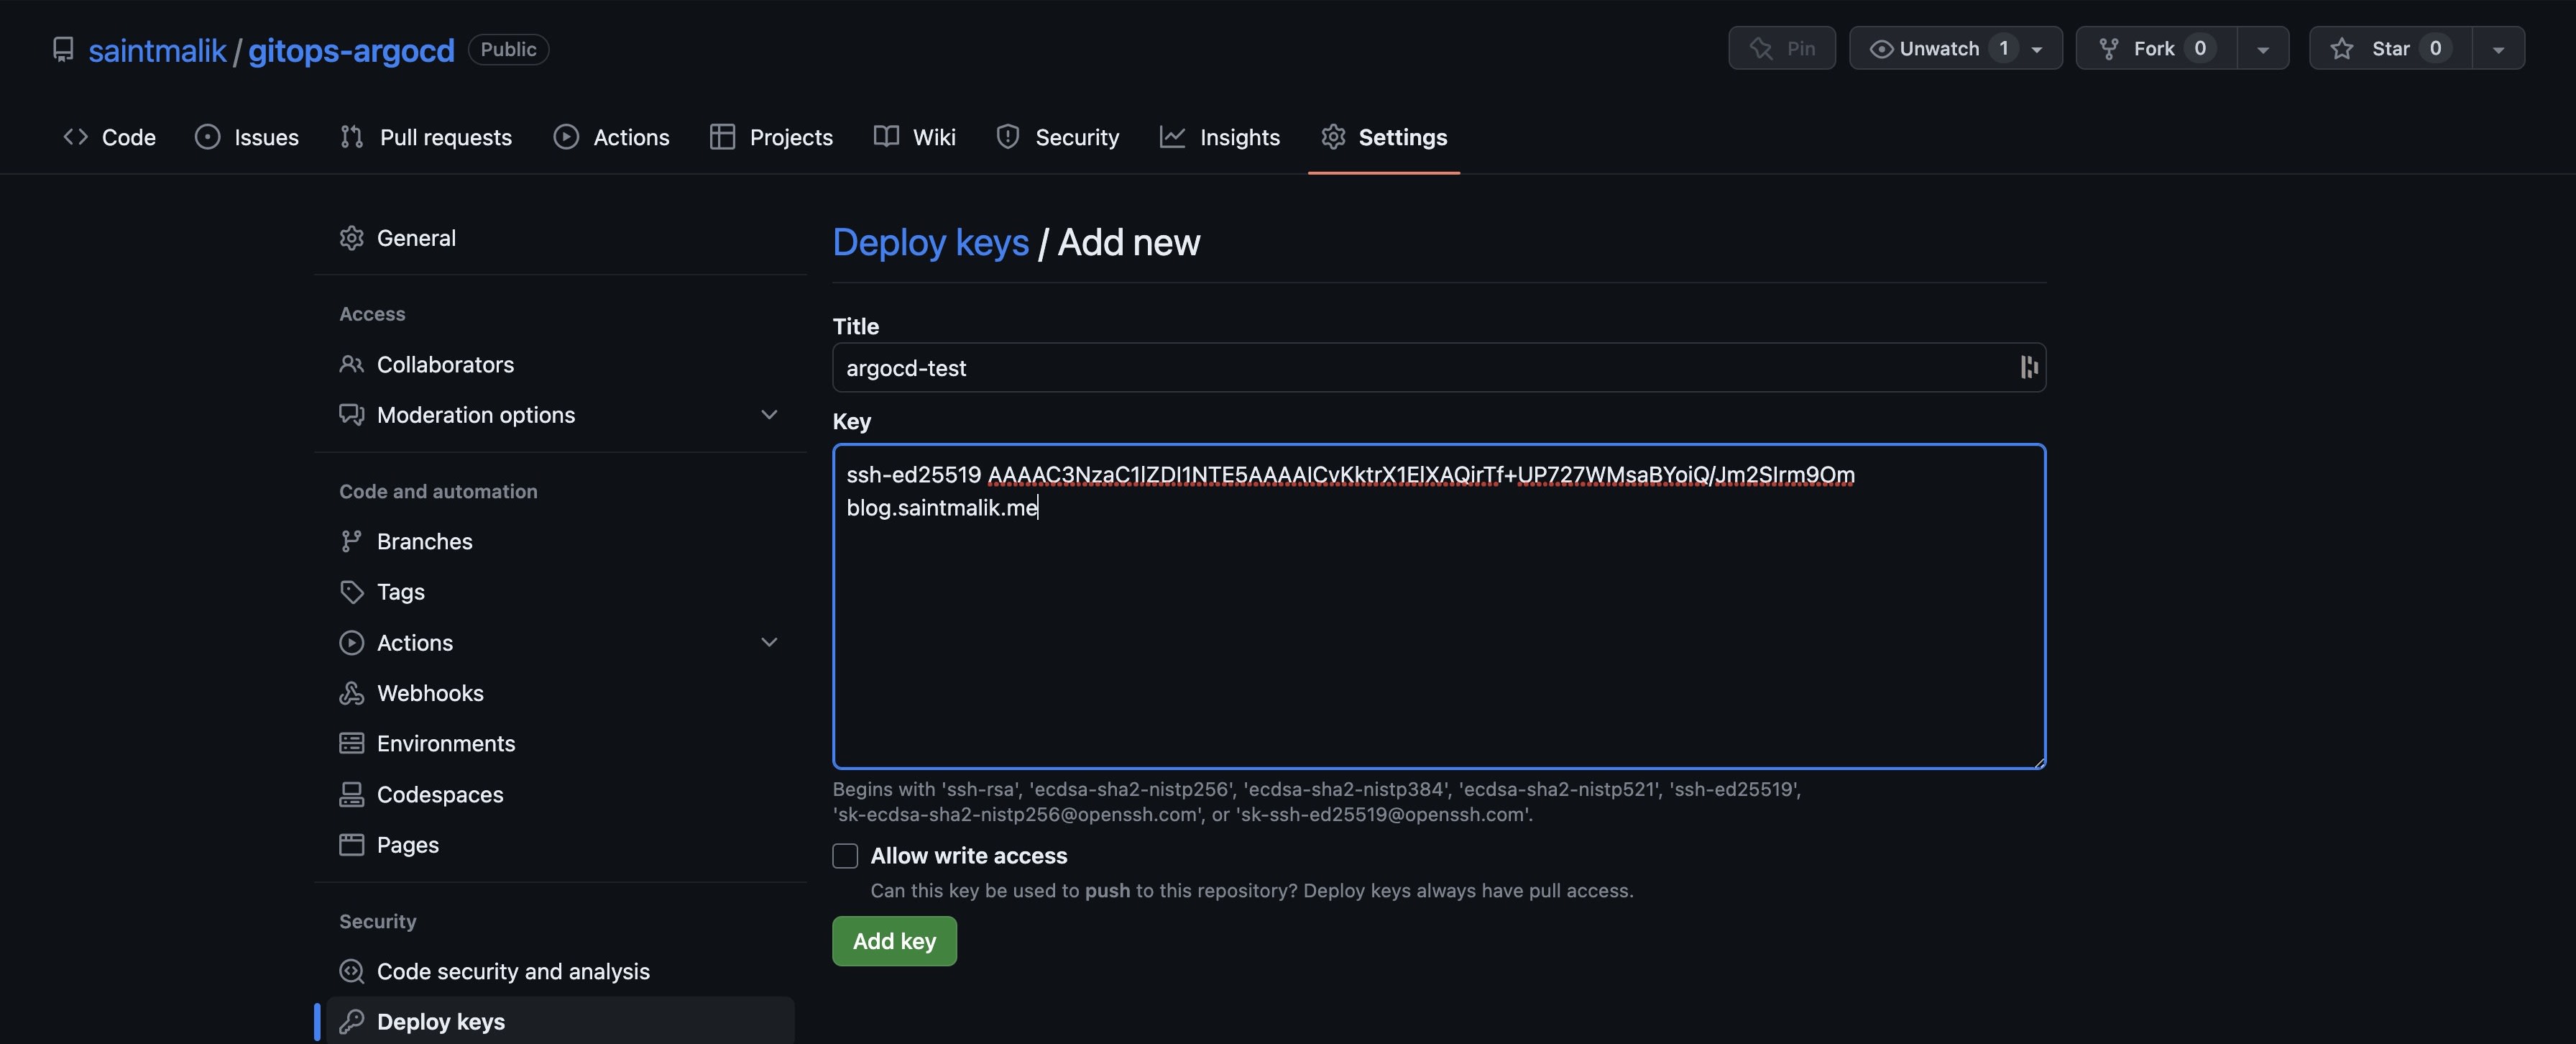
👉 Step 2 - Add the ssh public key to your repository
Now go to your GitHub repository settings and navigate to the Deploy Keys and click Add deploy key to add the public SSH key you generated earlier, it's inside the argo.pub file.
👉 Step 3 - Configure and connect your private repo
Now that you have added the private key to your repository, it's time for us to add the public key to your argocd server, so click the settings at the sidebar and hit the CONNECT REPO button and it should bring a screen just like the below image.
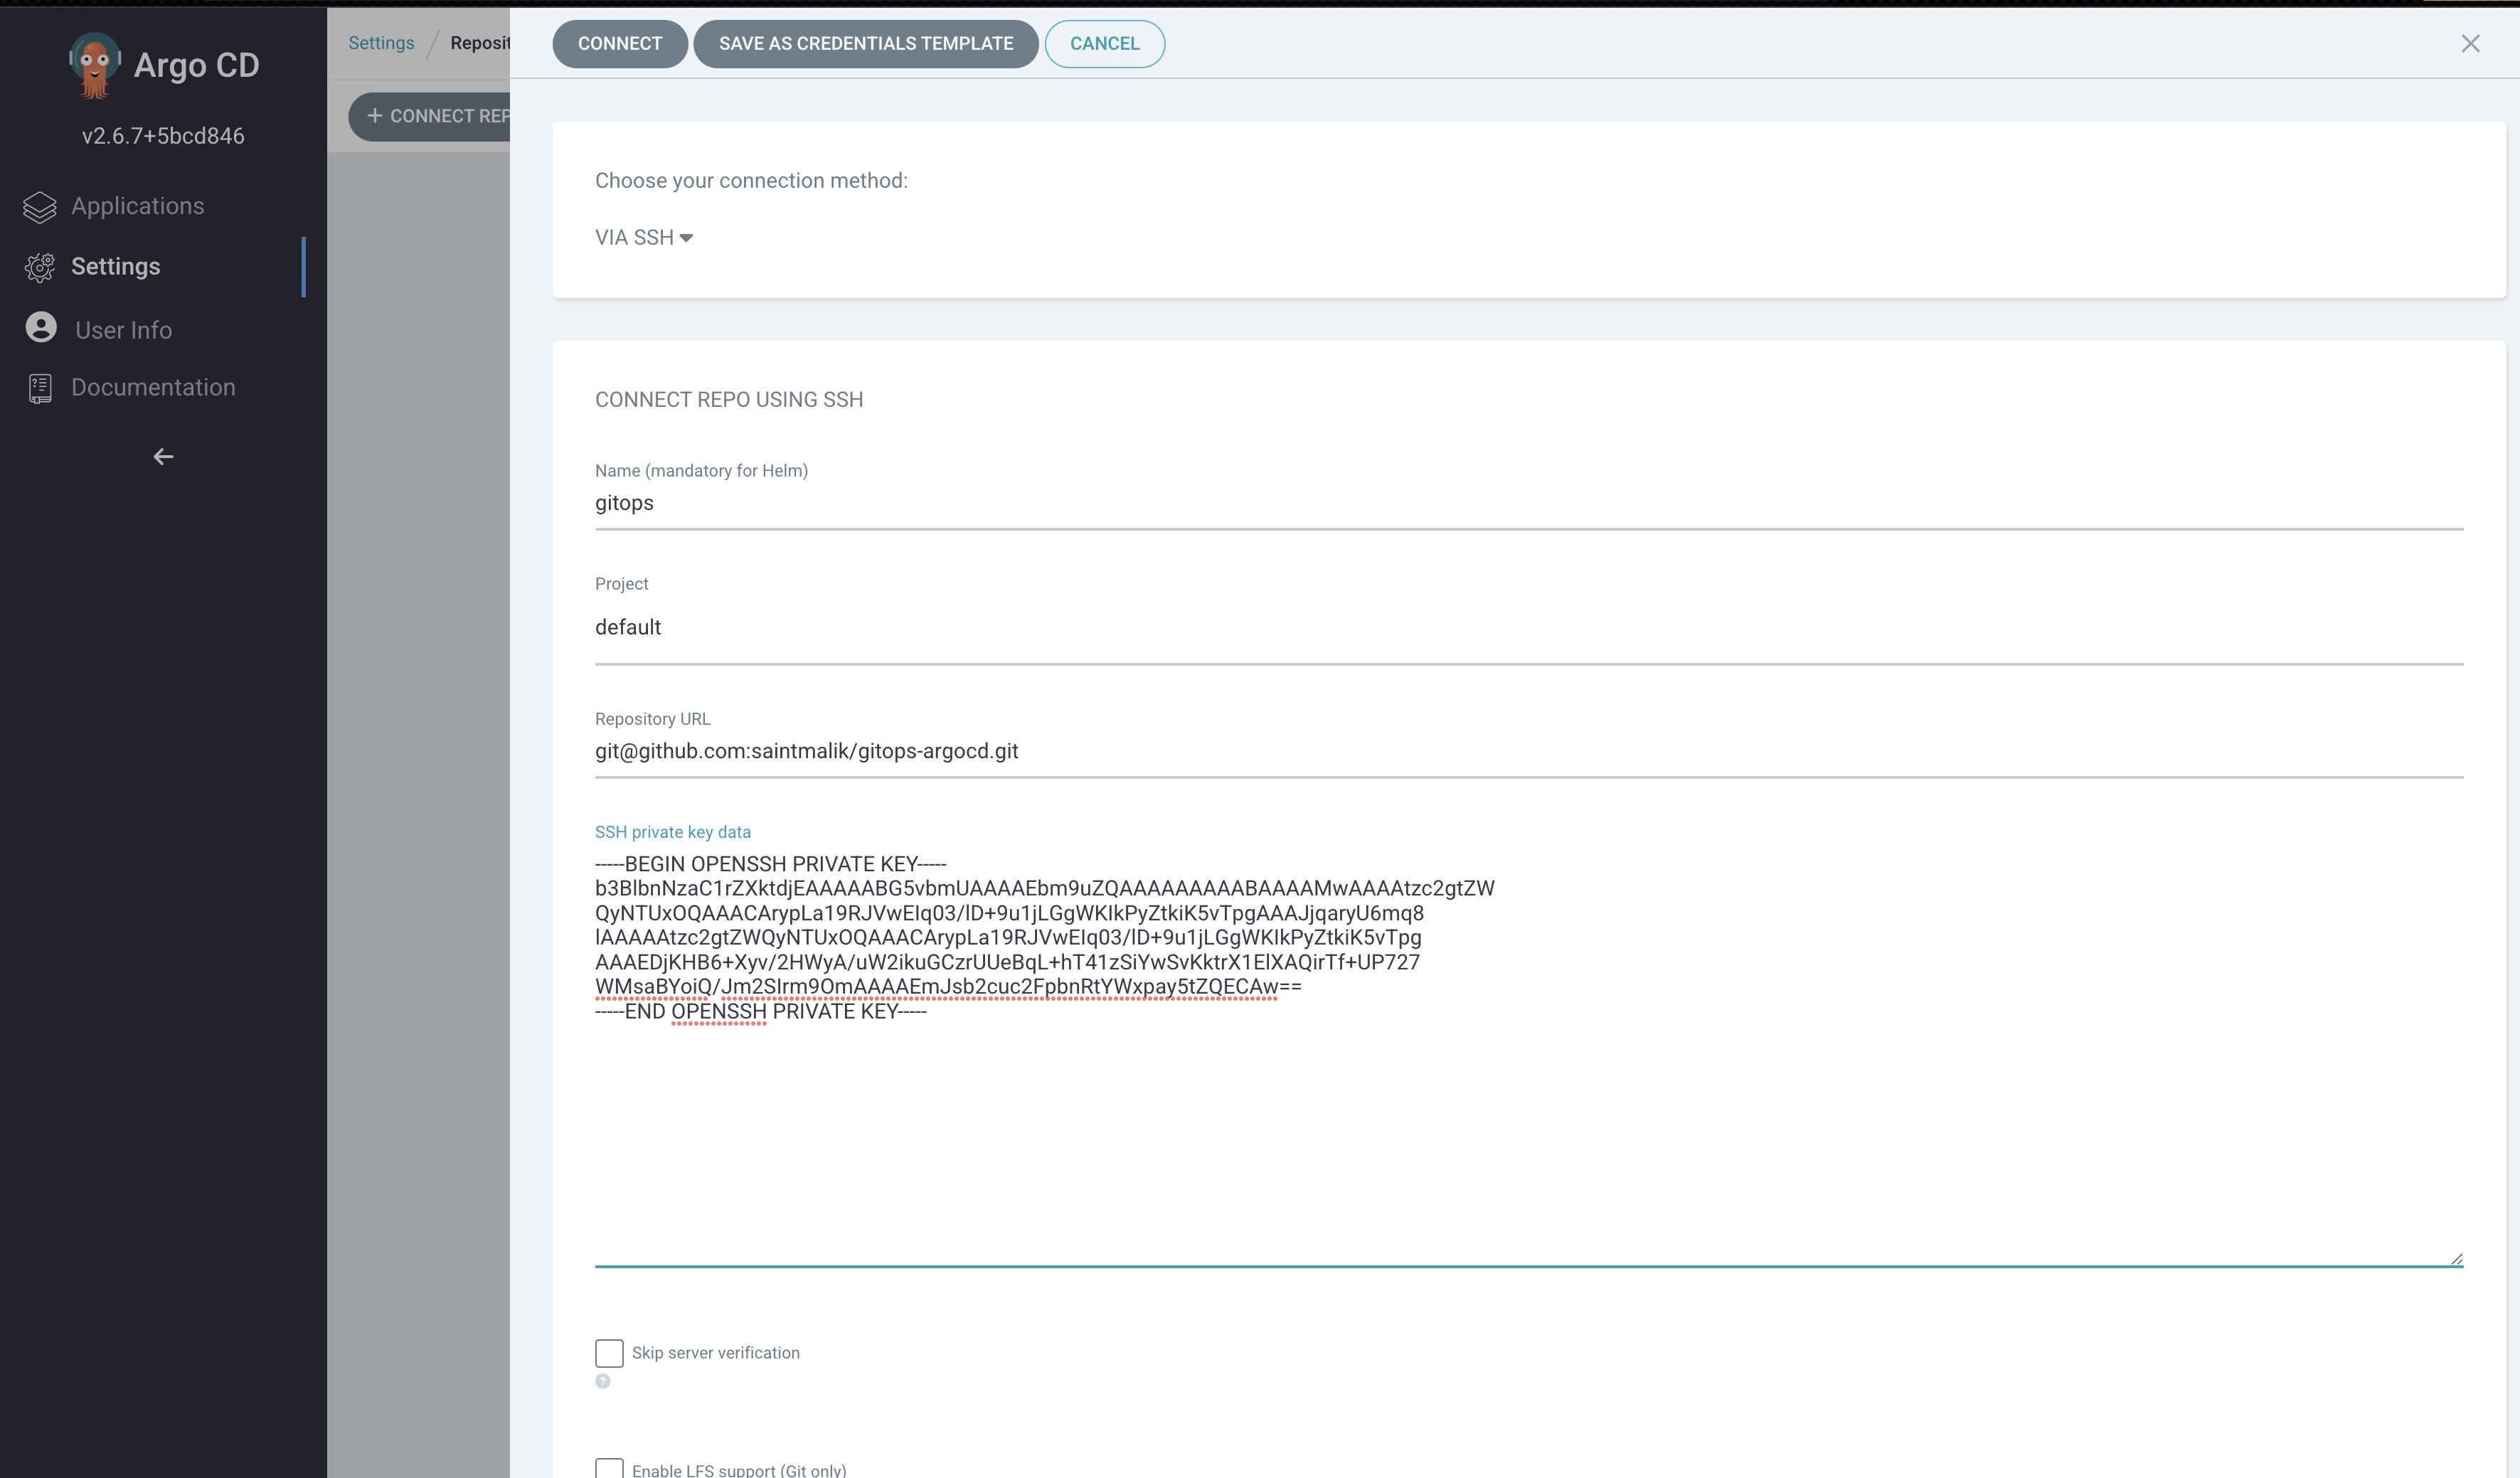
This is where you will add the private SSH key from the argo file you generated earlier, the repository URL should be added too in the format same as the one you are seeing in the screenshot and the Project selection should be default.
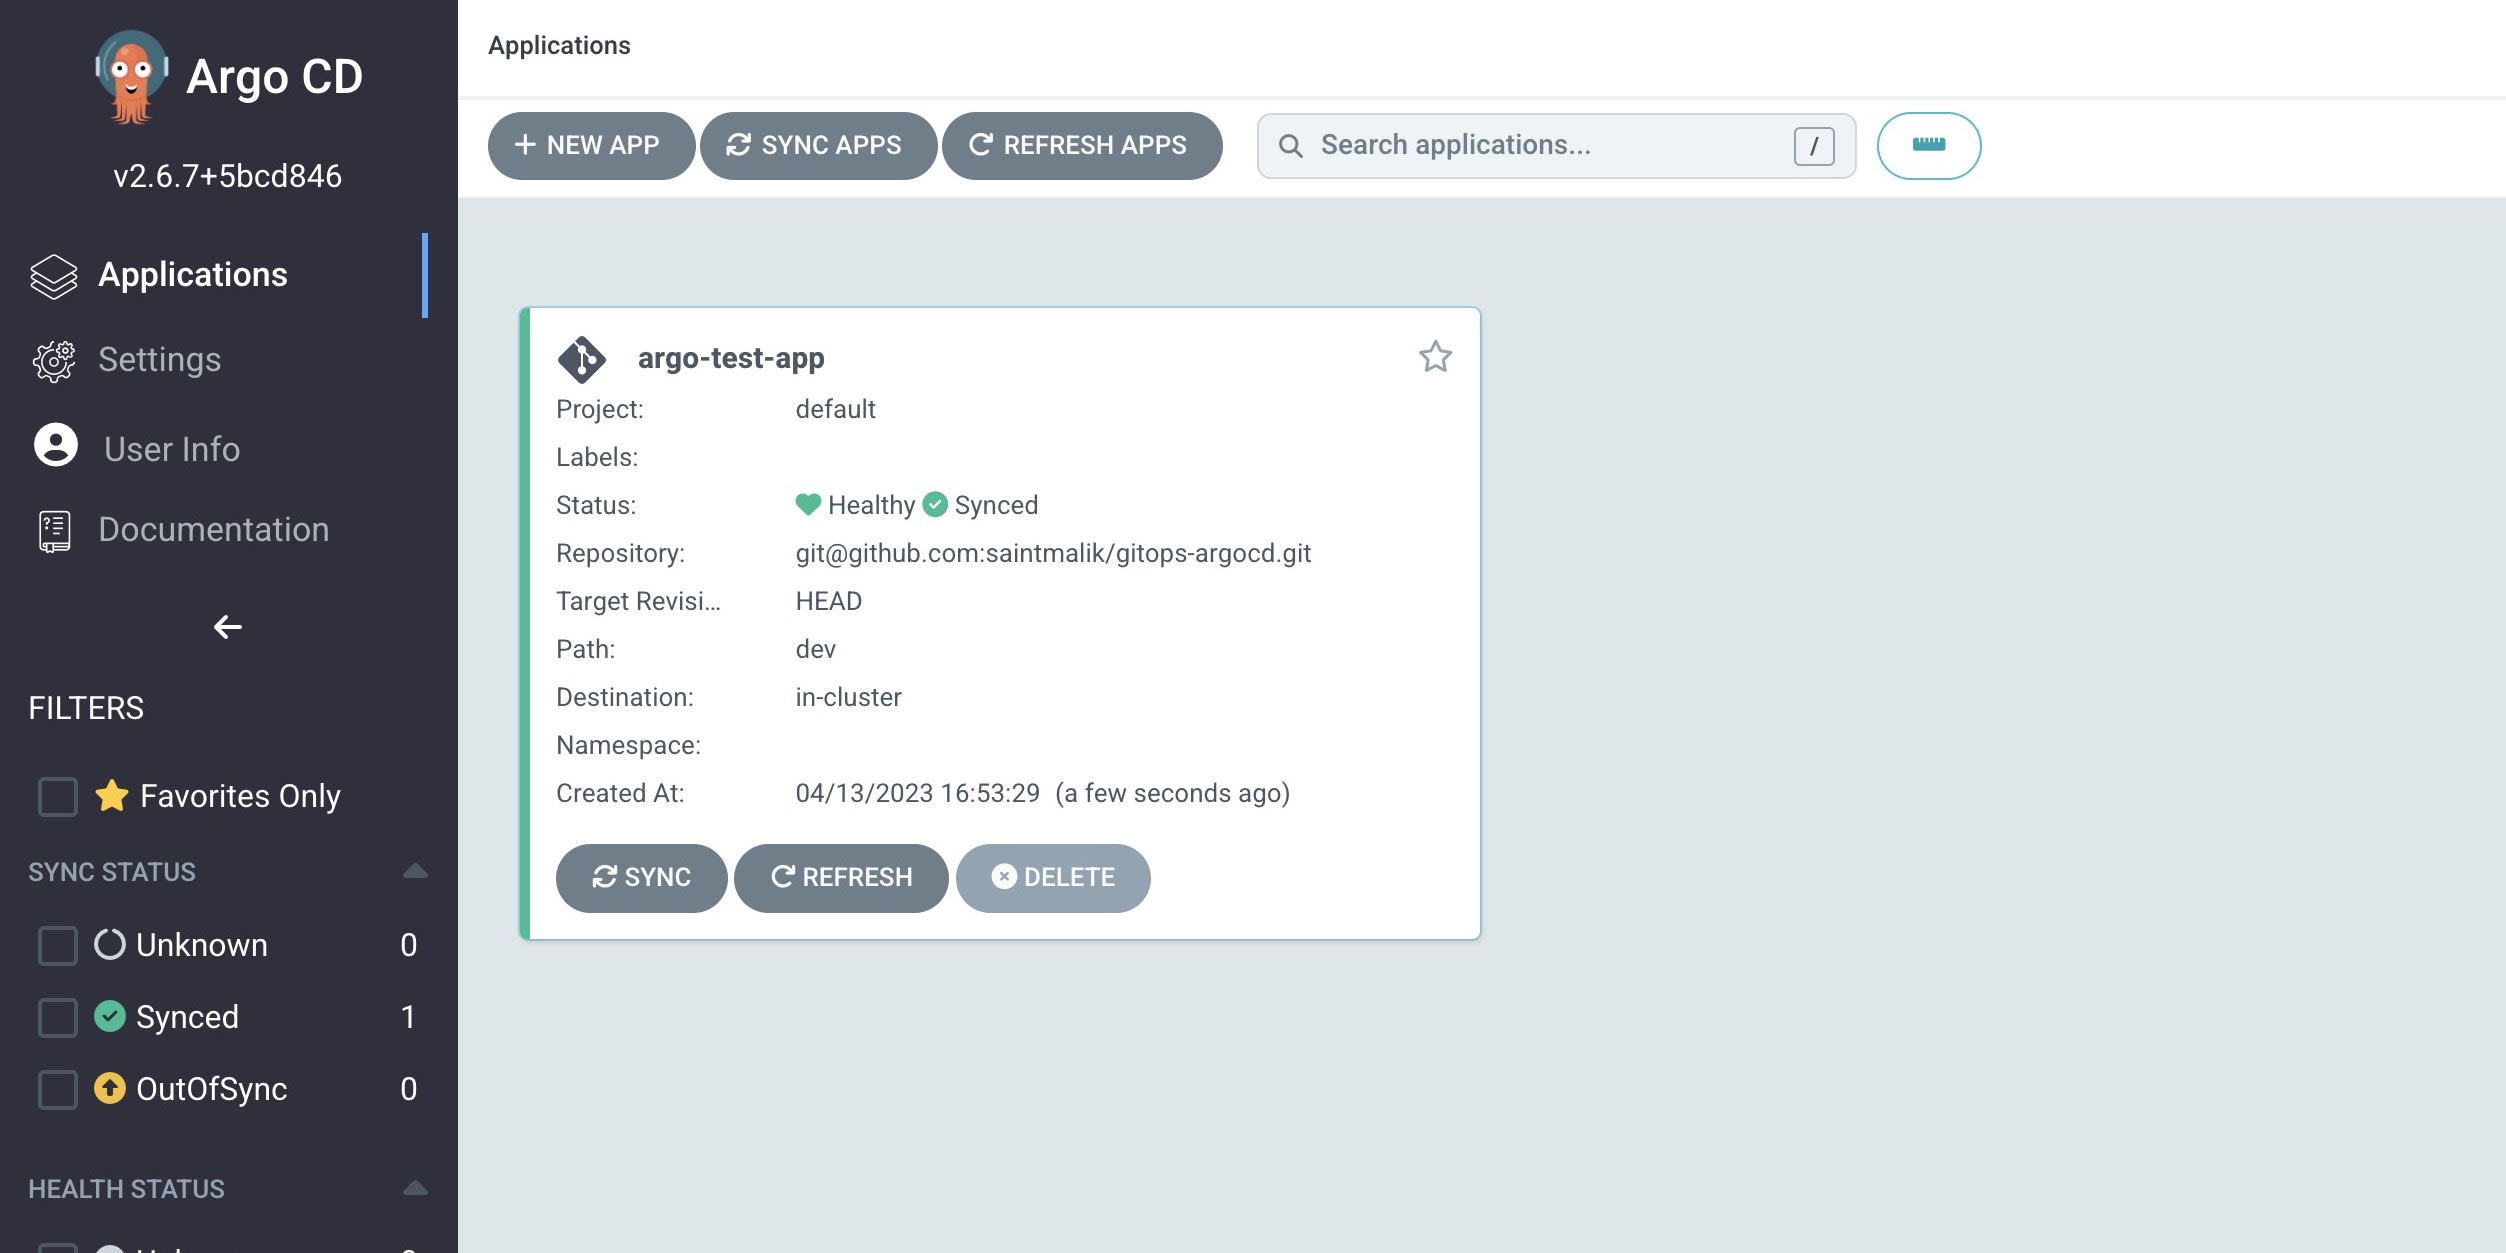
When you are done with the configuration, click on the CONNECT button and you should see a success message just like this.

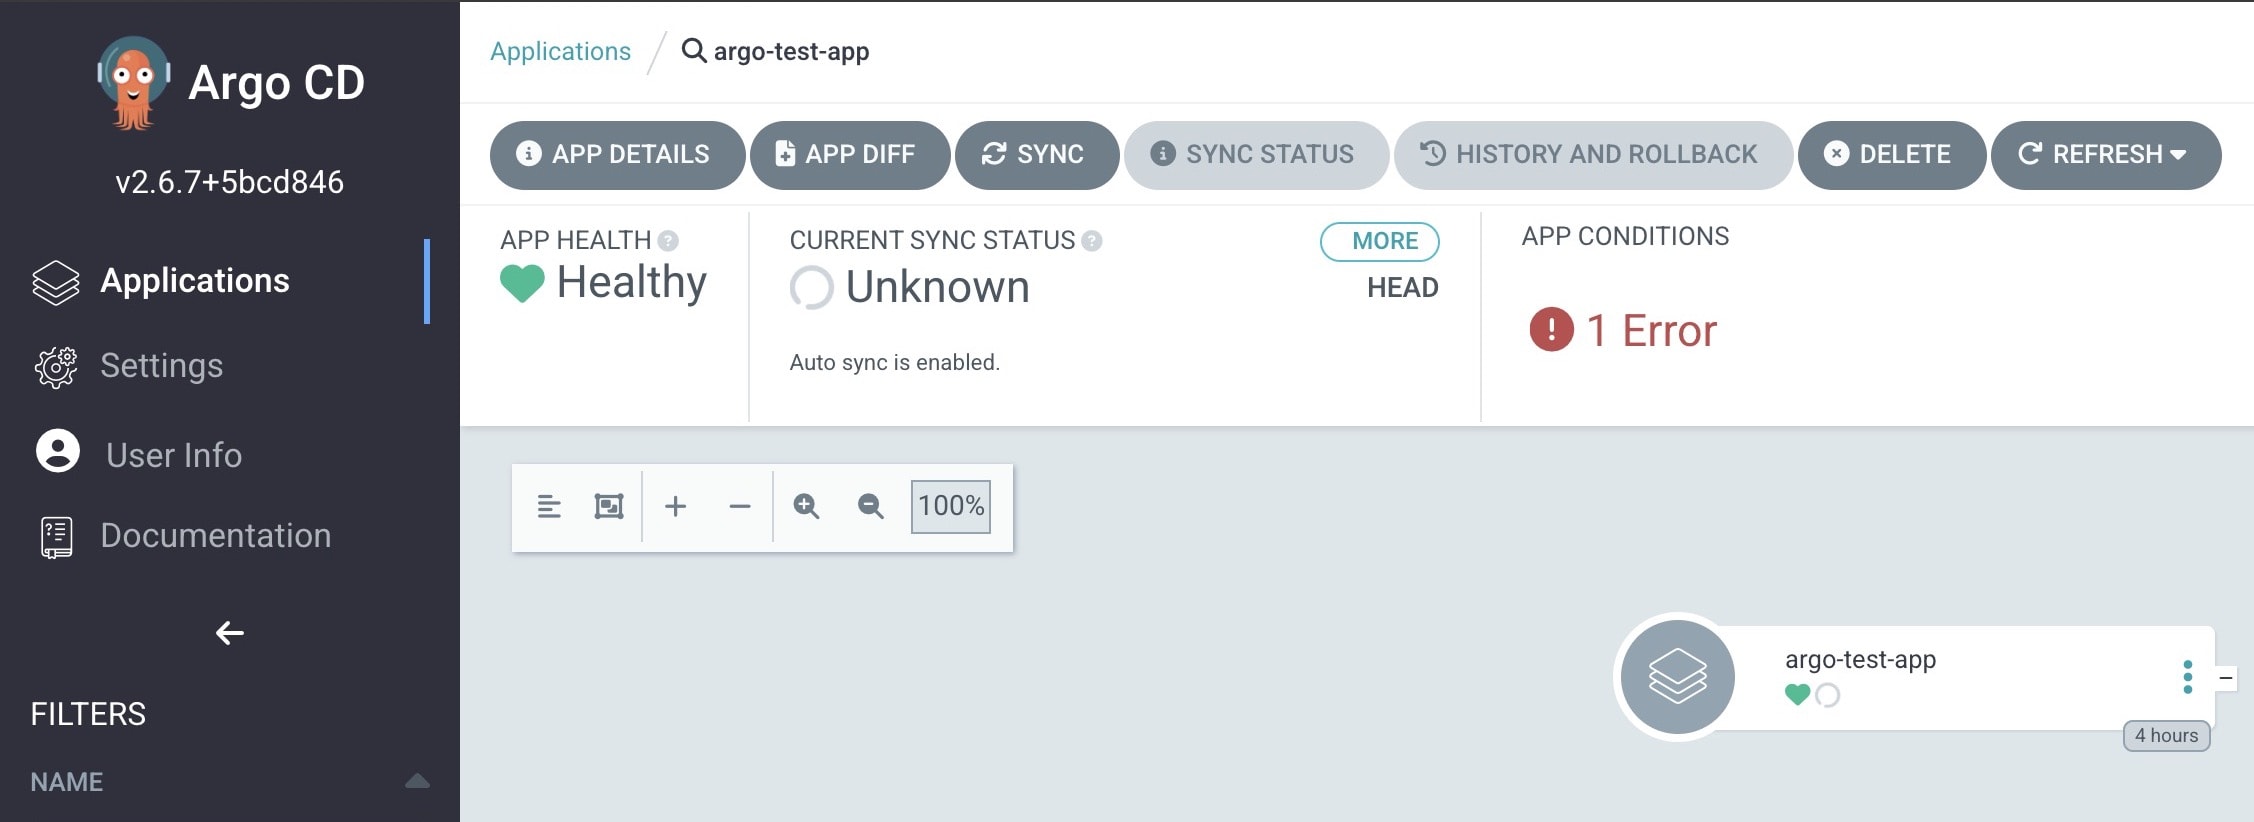
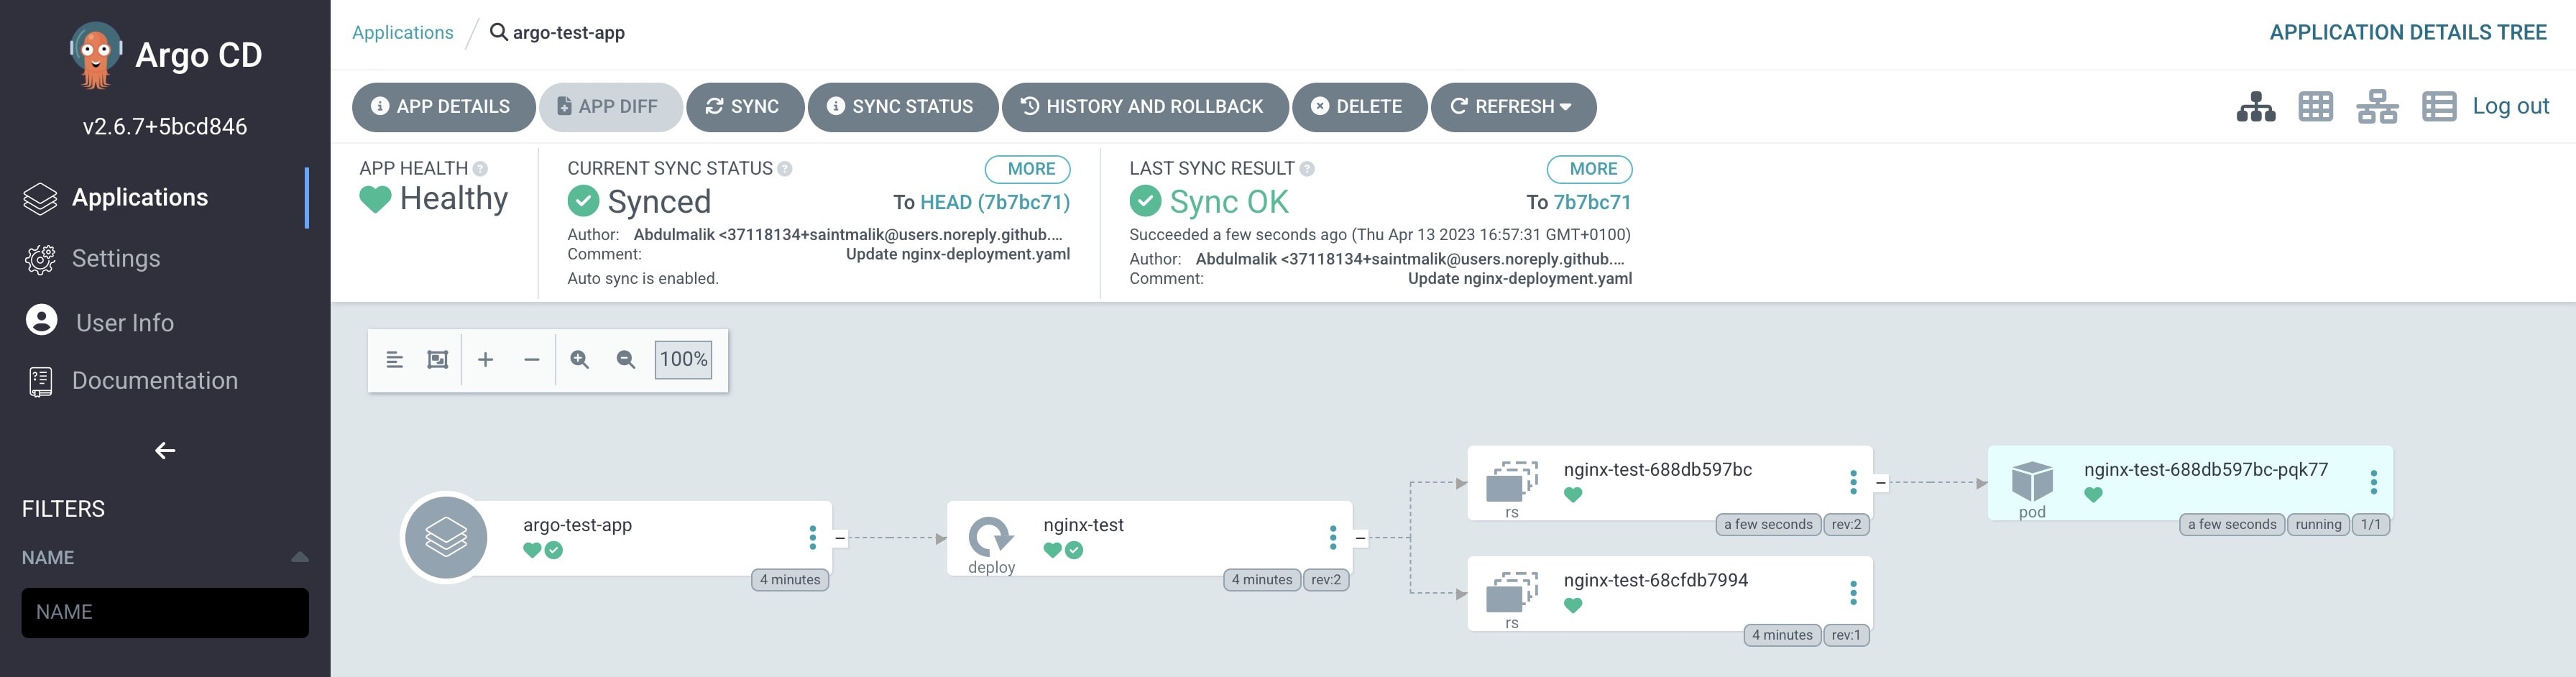
If this shows success, then your deployment argo app should be synced and healthy already and it should look just like this
When you click on the app, you should see more details about your deployment just like this
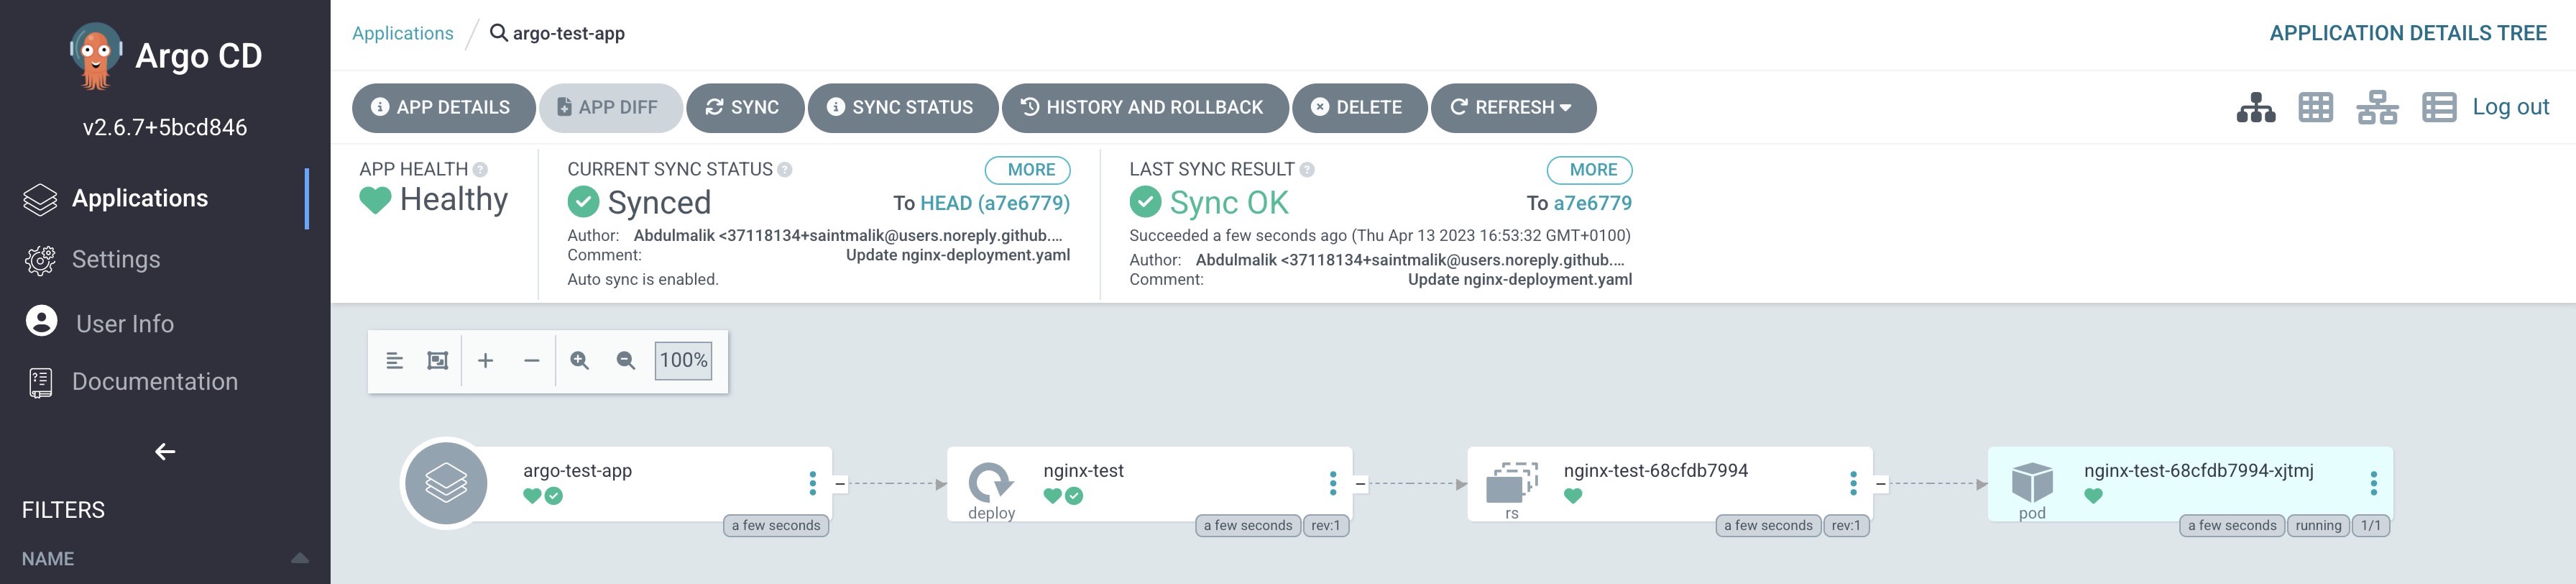
Only YAML files available in the dev folder of our repository will be deployed and luckily, I only have one, and that is the single deployment that you are seeing in the above screenshot
👉 Step 4 - Testing to see if everything works
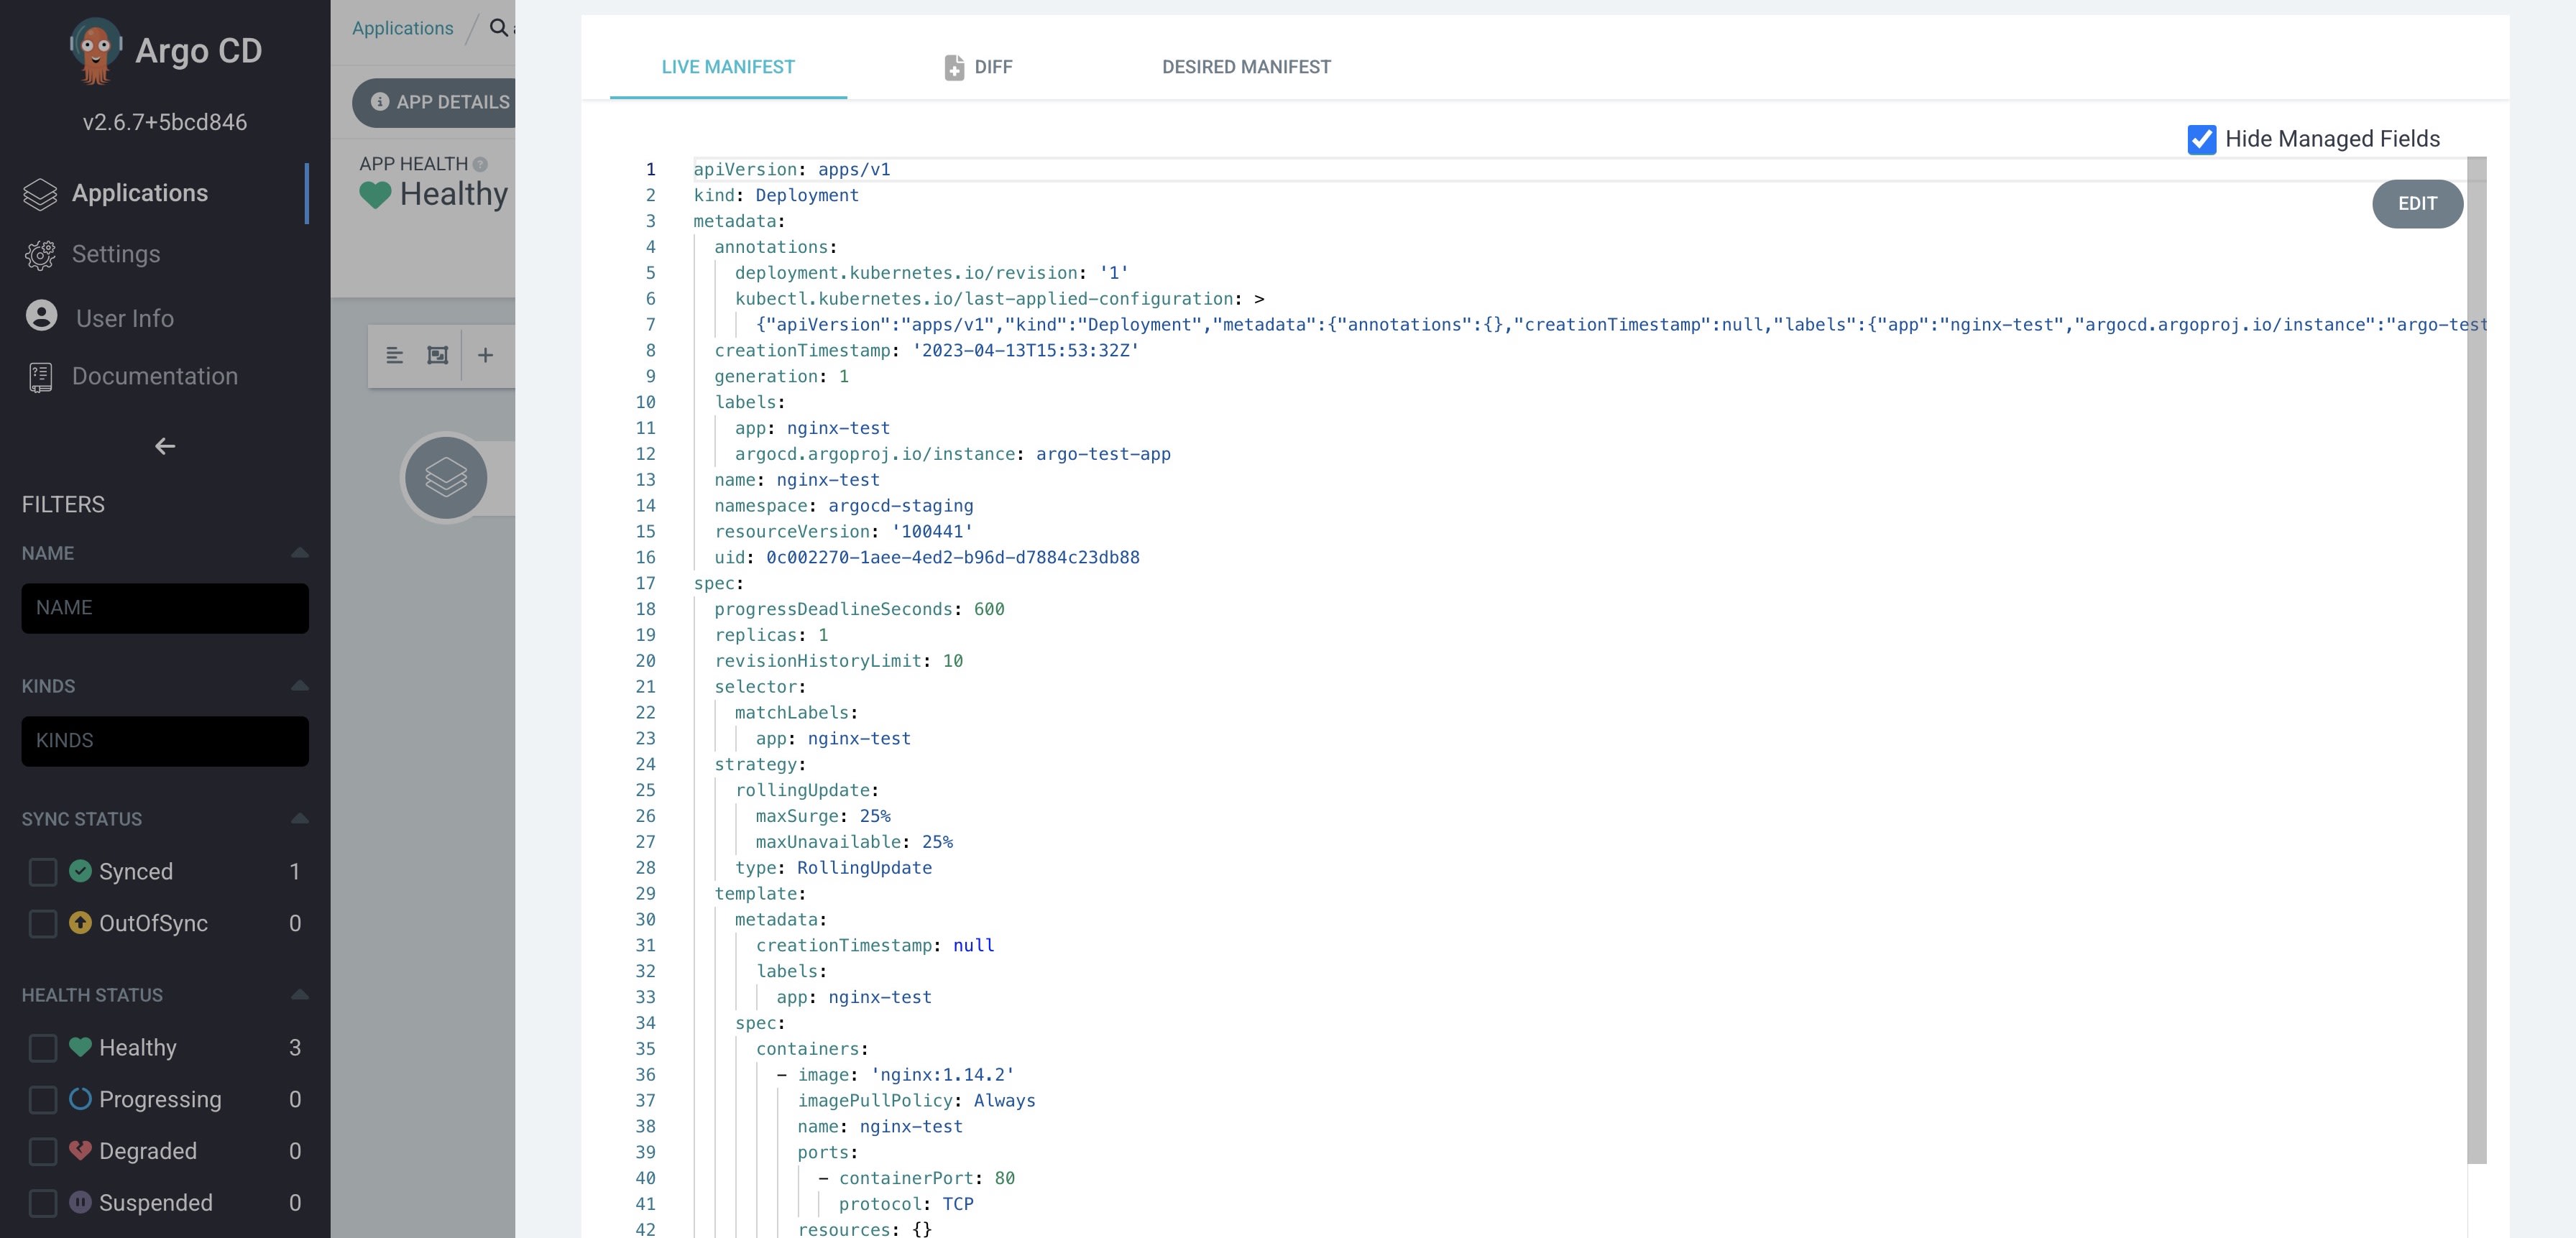
So to confirm if all you have done works well, you can now alter the image in our deployment yaml file from our GitHub repository, so I will edit the yaml file from Github now
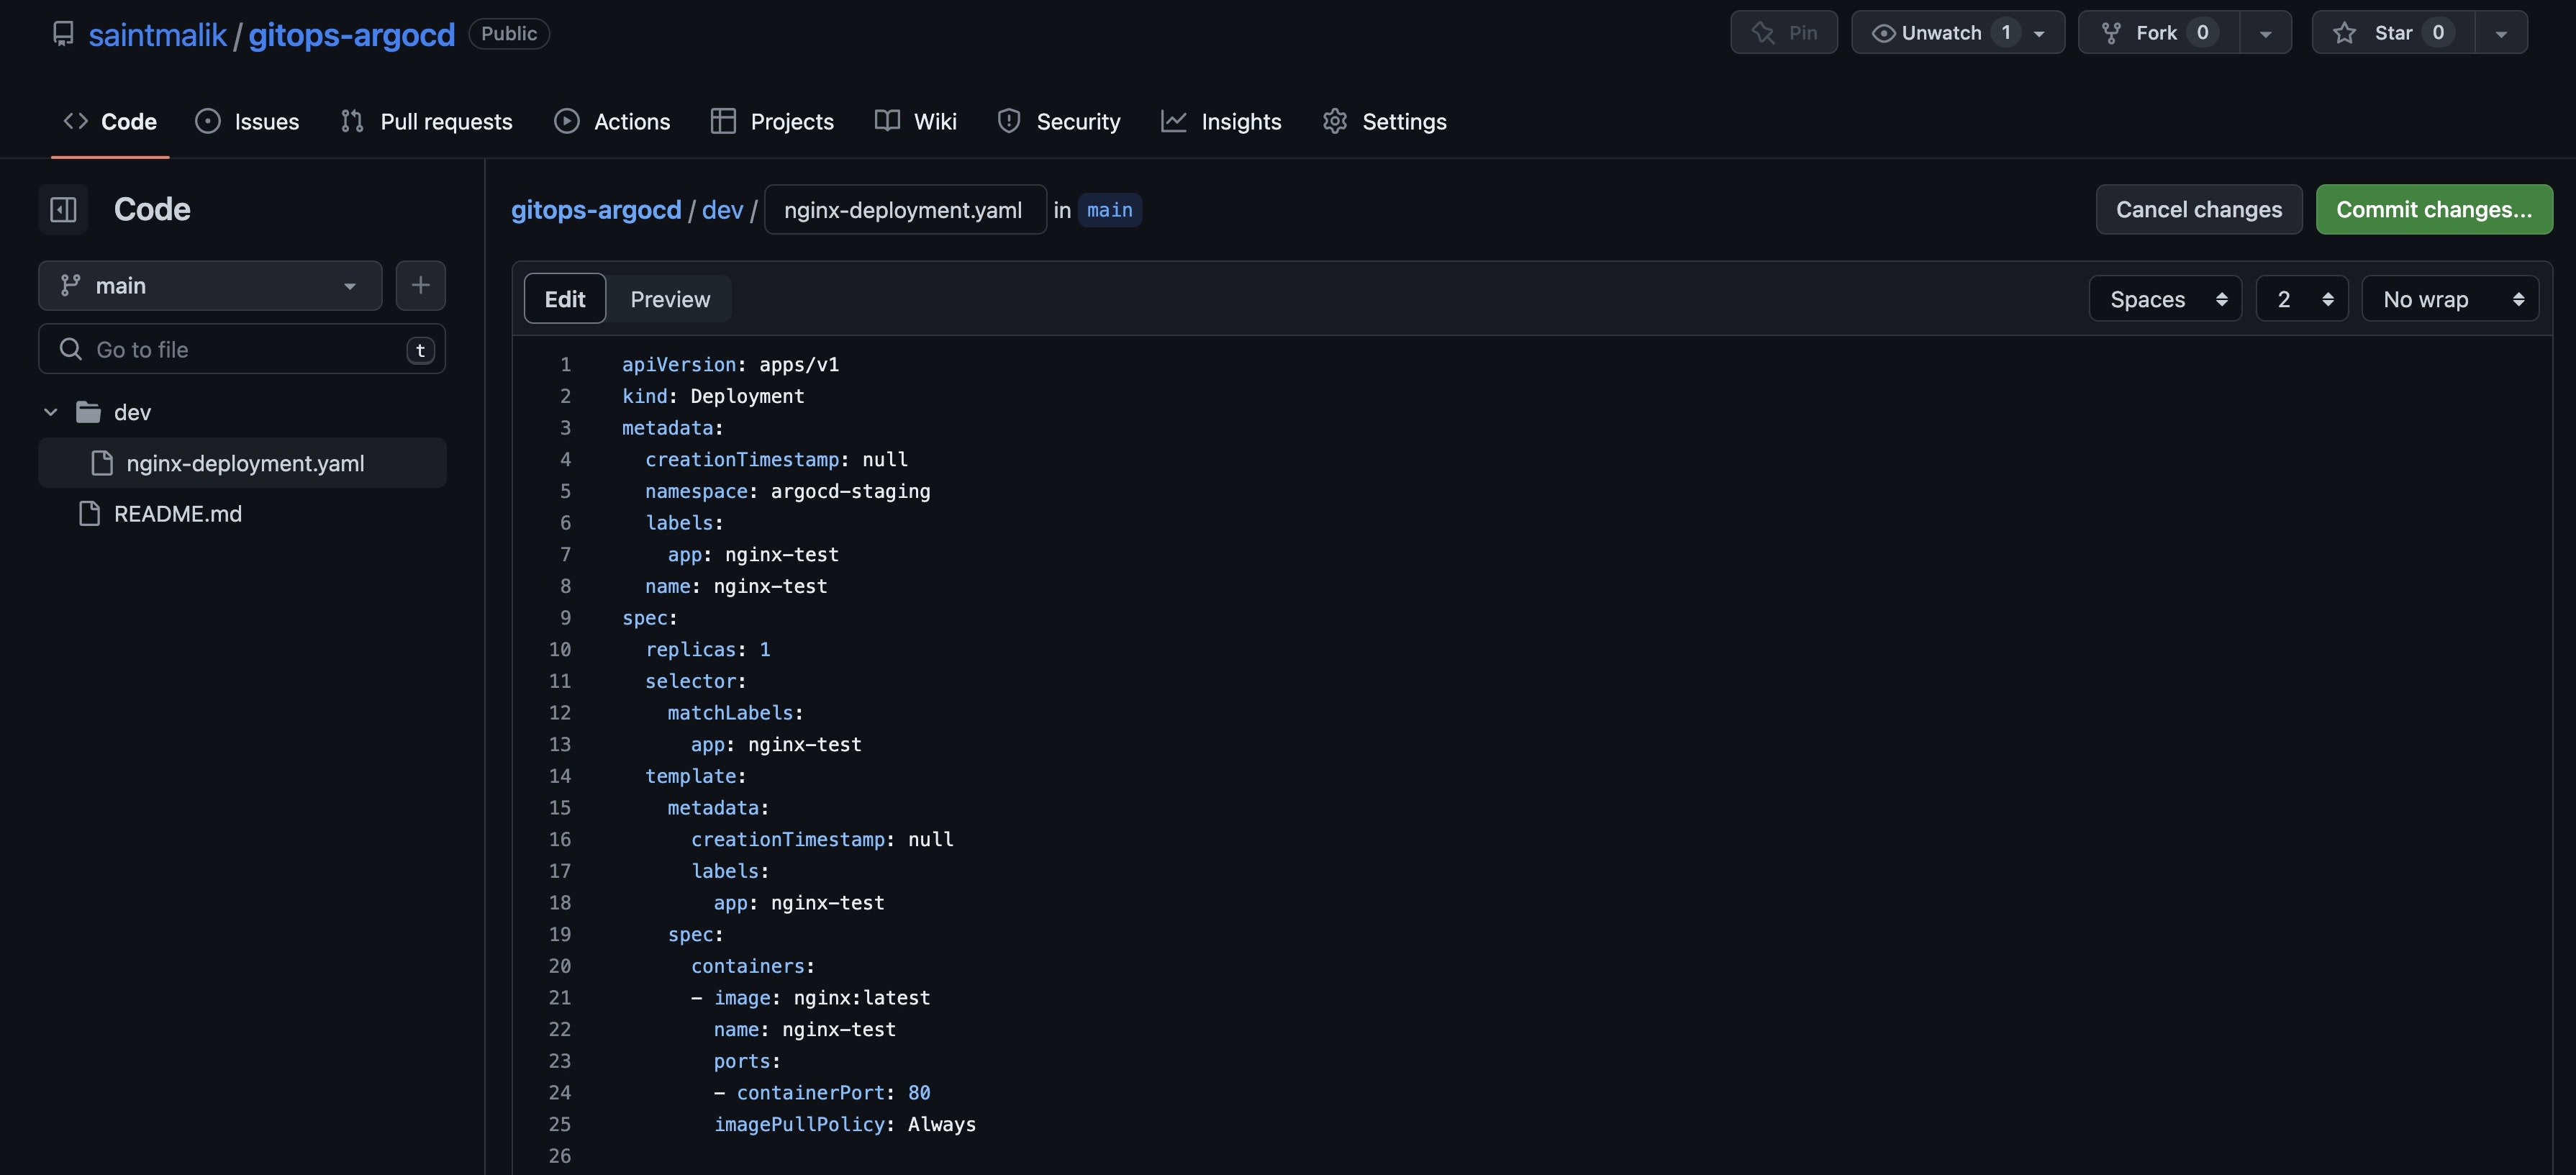
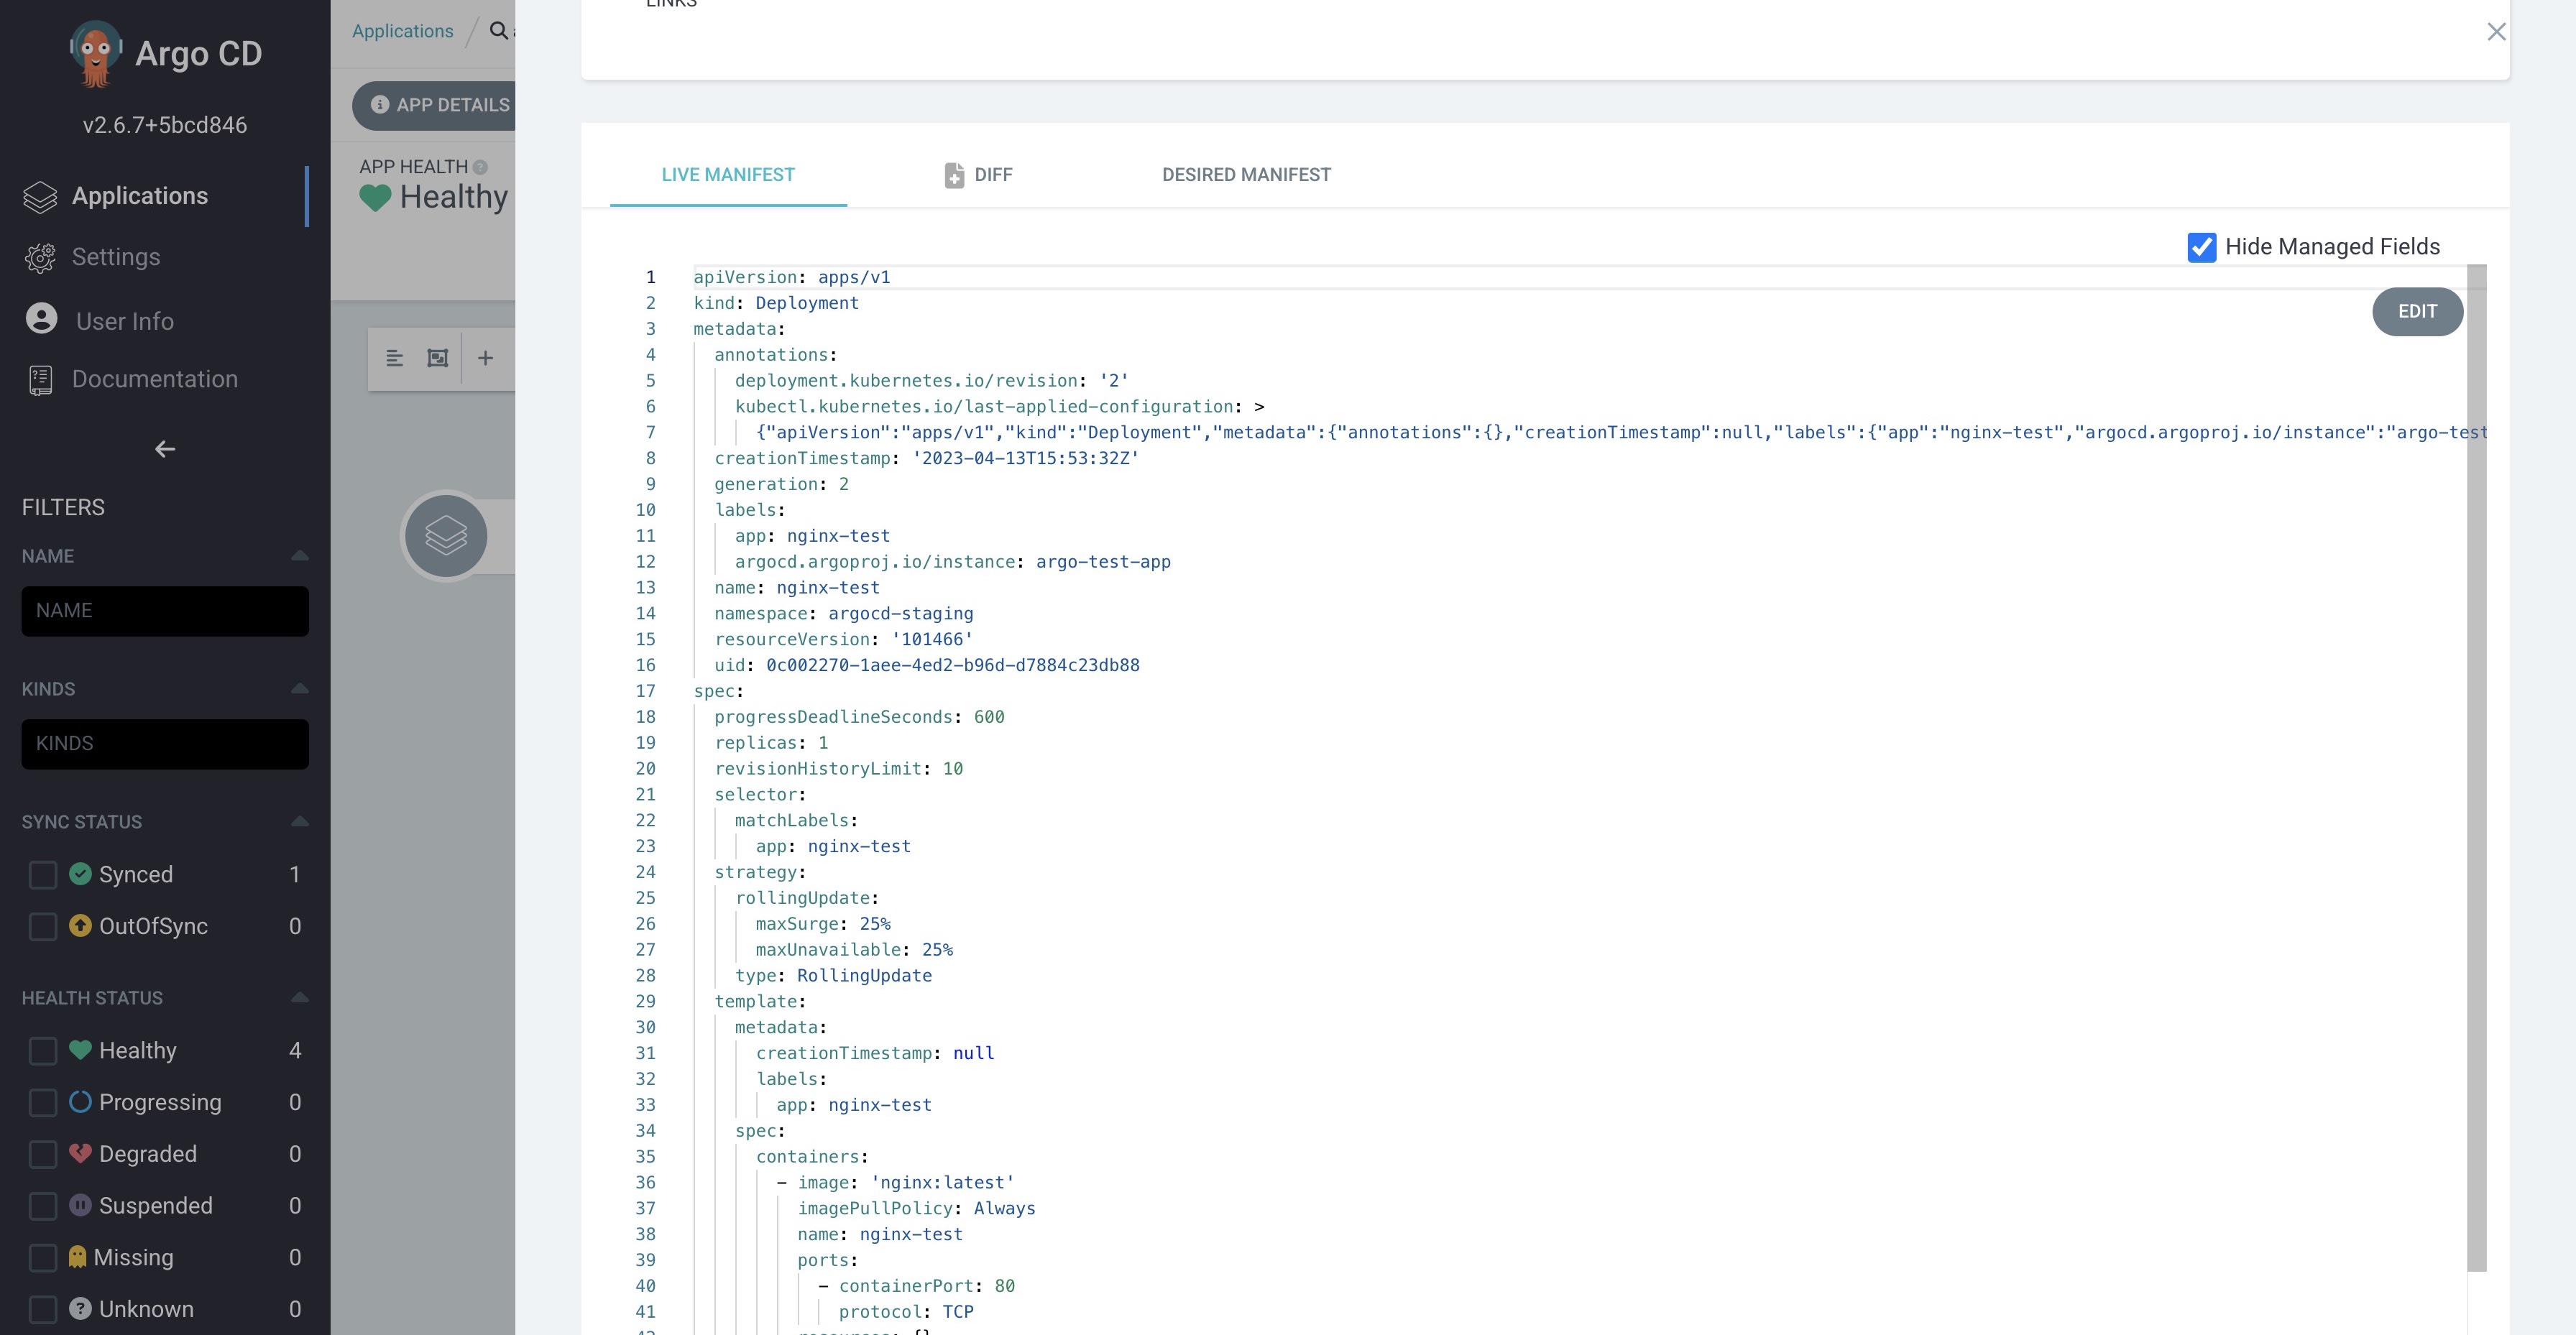
So I have changed the nginx image tag from nginx:1.14.2 to nginx:latest, so once I commit the changes, you can see it getting deployed real-time.
And here it is, it got deployed automatically, you see it created another replica and its deploying the new update and has terminated the existing pod created.
Deployment Comparison
first image
second image
Bonus step
You can also automate both steps 2 and 3 using Terraform, using terraform you can add the public key to your repository and also add the private key to your argocd server.
the catch here is that you need to add the GitHub provider to your Terraform code which also requires you to create a GitHub token.
terraform {
  required_version = ">= 1.7.0"
  required_providers {
    github = {
      source  = "integrations/github"
      version = "~> 5.0"
    }
  }
}

provider "github" {
  token = "your-github-token"
  owner = "your-github-username"
}
resource "github_repository_deploy_key" "argocd_repo_deploykey" {
  title      = "argocd-connect"
  repository = "gitops"
  key        = "REPLACE THIS WITH THE PUBLIC KEY YOU GENERATED IN STEP 1"
  read_only  = false
}
resource "kubernetes_secret_v1" "ssh_key" {
metadata {
name = "private-repo-ssh-key"
namespace = kubernetes_namespace.argocd.id
labels = {
"argocd.argoproj.io/secret-type" = "repository"
}
}
type = "Opaque"
data = {
"sshPrivateKey" = "REPLACE THIS WITH THE SSH PRIVATE KEY YOU GENERATED IN STEP 1"
"type" = "git"
"name" = "github"
"project" = "default"
}
}
Additionally, for faster syncing of your argocd deployment quicker when you make a new commit, you can add a webhook to your repository to trigger argocd to sync your application when there is a new commit.
This will help you avoid the 3-minute wait time for argocd to sync your application.
data "kubernetes_service" "argocd_server" {
  metadata {
    name      = "argocd-server"
    namespace = "argocd"
  }
}

resource "github_repository_webhook" "argocd" {
  repository = "gitops"
  configuration {
    url          = "https://${data.kubernetes_service.argocd_server.status.0.load_balancer.0.ingress.0.hostname}"
    content_type = "json"
    secret       = "skrrskrrrii" //the secrets to avoid ddos if argo link is exposed, its just a random texts
    insecure_ssl = true
  }

  active = true

  events = ["push"]
}
Completion criterion
ArgoCD is fully set up when:
- The ArgoCD server is reachable via its load balancer or port-forward.
- You can log in with the initial admin password.
- An ArgoCD Application exists and is synced to a Git repository.
- If the repository is private, the SSH deploy key is added to the repo and the matching private key is stored as a Secret in the
argocdnamespace. - Changing a manifest in Git and pushing it triggers a new sync (via webhook or the 3-minute poll).
If you run into issues, see the ArgoCD issues reference.
Till next time 🤞🏽