Autoscaling EKS Cluster With Karpenter Using Terraform

Struggling to pick the right autoscaler for your Kubernetes cluster? Trust me, I get it. With all the options out there, choosing between Cluster Autoscaler, Karpenter, and others can be overwhelming.
Here's the deal - while both Cluster Autoscaler and Karpenter are backed by AWS, I've found Karpenter to be consistently faster at both scaling up and down. Let me show you how to set it up.
Prerequisites
- Running EKS Cluster Provisioned with Terraform
- Create a Terraform file named
karpenter.tf
Let's jump into it;
Provision the metric server on your EKS
Karpenter needs the metric server because the metric server provides accurate metrics about pods in the nodes, That means you need to also set up resource limits for your deployments for better performance.
Now let's deploy the metric server with helm_release provider
resource "helm_release" "metric-server" {
  name            = "metric-server"
  repository      = "https://kubernetes-sigs.github.io/metrics-server/"
  chart           = "metrics-server"
  version         = "3.11.0"
  namespace       = "kube-system"
  cleanup_on_fail = true
  timeout         = "1200"
  set {
    name  = "apiService.create"
    value = "true"
  }
}
Provision Karpenter Policy, IRSA, Instance Profile and Karpenter Helm Release
At the end of the day Karpenter needs access to create and spin up nodes and ec2 instances in your EKS cluster on your behalf, this is where the IAM Role Service Account for EKS comes in.
👉 Step 1: Create the Karpenter controller policy
resource "AWS_iam_policy" "karpenter_controller" {
  name        = "KarpenterController"
  path        = "/"
  description = "Karpenter controller policy for autoscaling"
  policy = <<EOF
{
    "Statement": [
        {
            "Action": [
                "ec2:CreateLaunchTemplate",
                "ec2:CreateFleet",
                "ec2:RunInstances",
                "ec2:CreateTags",
                "ec2:TerminateInstances",
                "ec2:DeleteLaunchTemplate",
                "ec2:DescribeLaunchTemplates",
                "ec2:DescribeInstances",
                "ec2:DescribeSecurityGroups",
                "ec2:DescribeSubnets",
                "ec2:DescribeImages",
                "ec2:DescribeInstanceTypes",
                "ec2:DescribeInstanceTypeOfferings",
                "ec2:DescribeAvailabilityZones",
                "ec2:DescribeSpotPriceHistory",
                "iam:PassRole",
                "ssm:GetParameter",
                "pricing:GetProducts"
            ],
            "Effect": "Allow",
            "Resource": "*",
            "Sid": "Karpenter"
        },
        {
            "Action": "ec2:TerminateInstances",
            "Condition": {
                "StringLike": {
                    "ec2:ResourceTag/Name": "*karpenter*"
                }
            },
            "Effect": "Allow",
            "Resource": "*",
            "Sid": "ConditionalEC2Termination"
        },
        {
            "Effect": "Allow",
            "Action": "iam:PassRole",
            "Resource": "arn:aws:iam::777XXXX:role/KarpenterNodeRole-${module.eks.cluster_name}",
            "Sid": "PassNodeIAMRole"
        },
        {
            "Effect": "Allow",
            "Action": "eks:DescribeCluster",
            "Resource": "arn:aws:eks:US-EAST-2:777XXXX:cluster/${module.eks.cluster_name}",
            "Sid": "eksClusterEndpointLookup"
        }
    ],
    "Version": "2012-10-17"
}
EOF
}
Quick heads up: Don't forget to swap out 777XXXX with your AWS account ID and US-EAST-2 with your region. The ${module.eks.cluster_name} pulls your cluster name from the EKS module - if you're not using the module, just put your cluster name directly.
👉 Step 2: Create Karpenter EC2 Instance Profile
Now let's create the EC2 Instance profile which we are going to attach in the next step, and we will attach the existing EKS Node IAM Role, using module.eks.eks_managed_node_groups.regular.iam_role_name
resource "AWS_iam_instance_profile" "karpenter" {
  name = "KarpenterNodeInstanceProfile"
  role = module.eks.eks_managed_node_groups.regular.iam_role_name
}
👉 Step 3: Create Karpenter IAM Role Service Account for EKS
here you can just use the IRSA modules instead of the other raw way, which makes you move faster with fewer lines of code.
module "karpenter_irsa_role" {
  source    = "terraform-AWS-modules/iam/AWS//modules/iam-role-for-service-accounts-eks"
  version   = "5.32.1"
  role_name = "karpenter_controller"

 ## i am attaching the policy i created in step 2 here instead of using the attach_karpenter_controller_policy = true argument

  role_policy_arns = {
    policy = aws_iam_policy.karpenter_controller.arn
  }

  karpenter_controller_cluster_id         = module.eks.cluster_id
  karpenter_controller_node_iam_role_arns = [module.eks.eks_managed_node_groups["regular"].iam_role_arn]

  oidc_providers = {
    main = {
      provider_arn               = module.eks.oidc_provider_arn
      namespace_service_accounts = ["kube-system:karpenter"]
    }
  }
}
👉 Step 4: Deploy Karpenter on EKS using Helm Release
Now we can deploy Karpenter using helm_release resource
resource "helm_release" "karpenter" {
  name            = "karpenter"
  chart           = "karpenter"
  repository      = "oci://public.ecr.aws/karpenter"
  version         = "1.0.6"
  namespace       = "kube-system" #refrenced the namespaced we created in step 1
  cleanup_on_fail = true
  set {
    name  = "serviceAccount.annotations.eks\\.amazonaws\\.com/role-arn"
    value = module.karpenter_irsa_role.iam_role_arn #here we refrenced the IRSA ARN created in setp 4
  }
  set {
    name  = "replicas"
    value = "1"
  }

  set {
    name  = "settings.clusterName"
    value = module.eks.cluster_name
  }

  set {
    name  = "settings.clusterEndpoint"
    value = module.eks.cluster_endpoint
  }

  set {
    name  = "webhook.enabled"
    value = "true"
  }
  set {
    name  = "settings.batchMaxDuration"
    value = "15s"
  }
}
Configure Karpenter Node Autoscaling using NodePools and NodeClasses
Now you are almost done setting up Karpenter on EKS, you just have to configure and deploy NodePools and NodeClasses
NodePools?, this is the configuration you can use in declaring the type of nodes you want karpenter to create and the type of pods that can run on those nodes, the time it should take those nodes to be terminated when empty and more, you can read more about nodepools
With the below nodepools, we are simply telling Karpenter to spin up an ON DEMAND node in either m5 EC2 Instances or t3 EC2 Instances but also not in the sizes of nano, micro, small or large, so we won't see t3.large or c5.large but we can see t3.medium, c5.medium and more.
resource "kubectl_manifest" "nodepools" {
  yaml_body = <<-YAML
apiVersion: karpenter.sh/v1
kind: NodePool
metadata:
  name: default
spec:
  template:
    spec:
      nodeClassRef:
        group: karpenter.k8s.aws
        kind: EC2NodeClass
        name: default
      expireAfter: 720h
      requirements:
        - key: karpenter.sh/capacity-type
          operator: In
          values: ["on-demand"]
        - key: karpenter.k8s.aws/instance-family
          operator: In
          values: [t3, c5]
        - key: karpenter.k8s.aws/instance-size
          operator: NotIn
          values: [nano, micro, small, large]
  limits:
    cpu: 100
  disruption:
    consolidationPolicy: WhenEmptyOrUnderutilized
    consolidateAfter: 1m
  YAML
}
And here is NodeClasses, NodeClasses Dictates to the NodePools which subnets, security groups, or amiFamily that would be attached to the nodes that the NodePools will be creating, i f the nodes be attached to a private subnet or public.
If a private subnet is declared in the subnetSelectorTerms, this means the nodes will be created in the private subnet, likewise the subnet Security Group, head over to the docs on NodeClasses to read more about node classes options.
data "aws_ami" "eks_al2023" {
  most_recent = true
  owners      = ["amazon"]

  filter {
    name   = "name"
    values = ["amazon-eks-node-al2023-x86_64-standard-1.31-*"]
  }
}
locals {
  ami_name_parts  = split("-", data.aws_ami.eks_al2023.name)
  version_part    = element(local.ami_name_parts, length(local.ami_name_parts) - 1)
  latest_date_tag = substr(local.version_part, 1, 8)
}
resource "kubectl_manifest" "karpenter_nodeclass_template" {
  yaml_body = <<-YAML
apiVersion: karpenter.k8s.aws/v1
kind: EC2NodeClass
metadata:
  name: default
spec:
  amiFamily: AL2023
  subnetSelectorTerms:
    - id: "REPLACE-YOUR-PRIVATE-EKS-SUBNETS"
    - id: "REPLACE-YOUR-PRIVATE-EKS-SUBNETS"
  securityGroupSelectorTerms:
    - id: "REPLACE YOUR EKS NODE SECURITY GROUP ID"
  role: "REPLACE YOUR EKS NODE IAM ROLE"
  amiSelectorTerms:
    - alias: al2023@v${local.latest_date_tag}
  # instanceProfile:
  metadataOptions:
    httpEndpoint: enabled
    httpProtocolIPv6: disabled
    httpPutResponseHopLimit: 2
    httpTokens: required
  YAML
}
Now that we are done with the codes, you can run the Terraform plan and apply it, then create a small deployment and scale it up and down to test your just concluded Karpenter installation.
The results from my side are that, it helped us use our nodes to their maximum level before provisioning another node compared to when we didn't have karpenter, we had a lot of resources and space wasting.
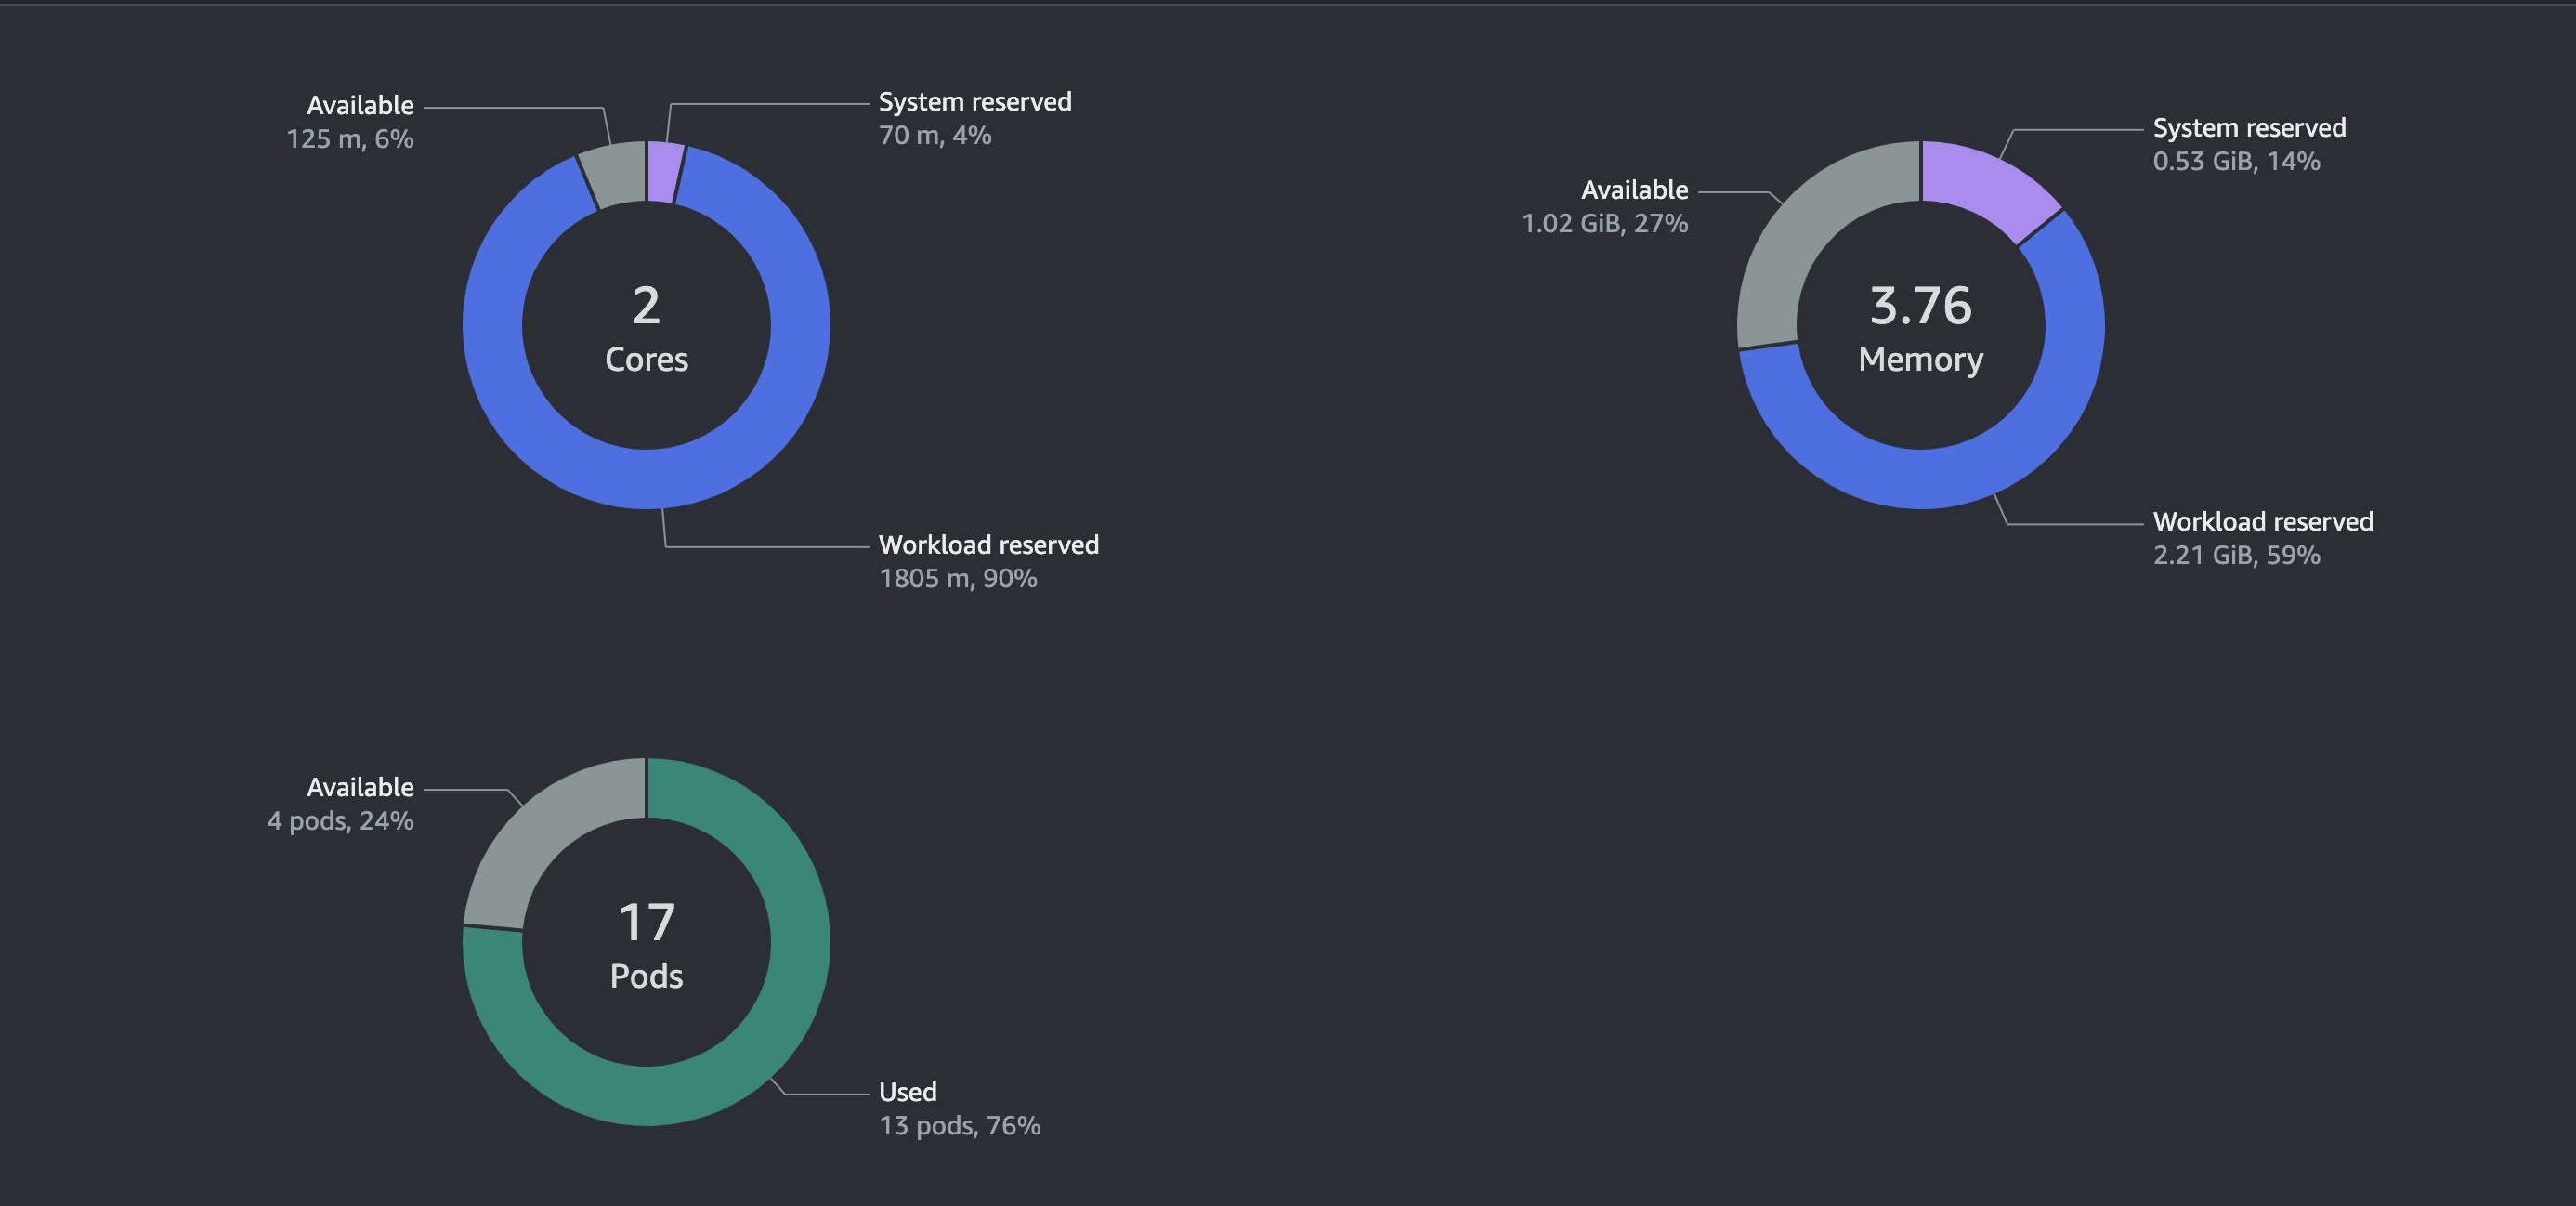
t3.medium Node created by Karpenter used up well
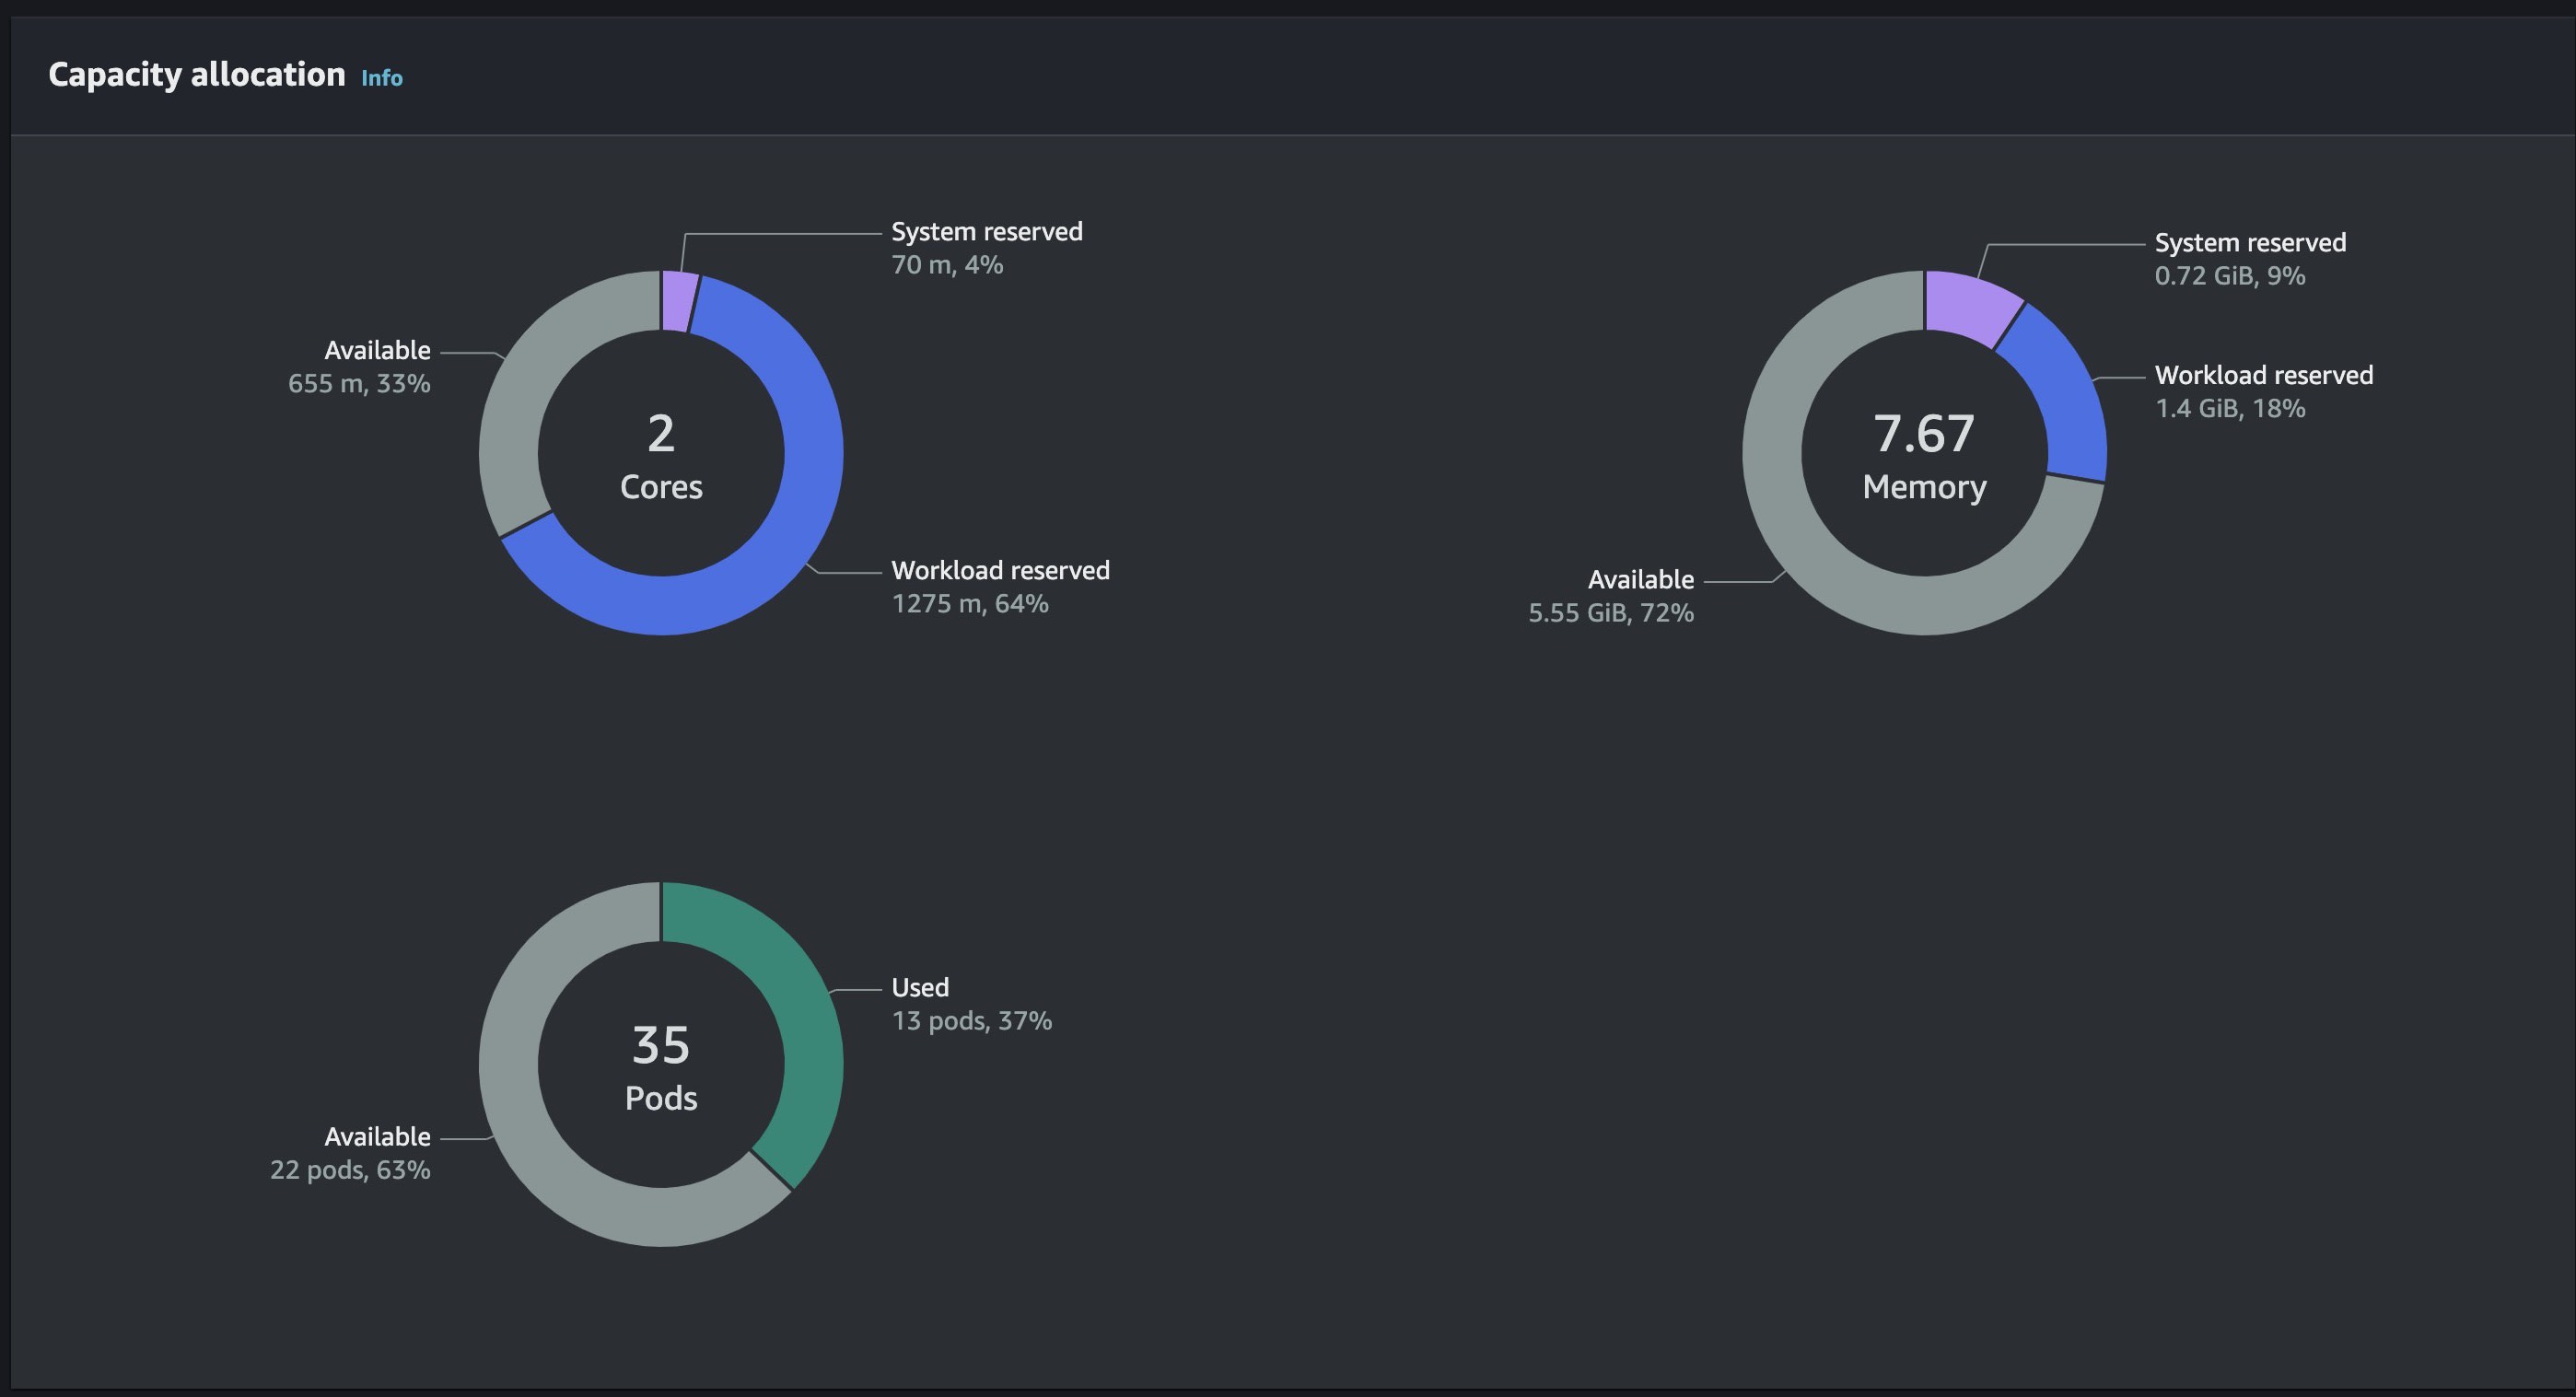
t3.large Node Created Manually Having Much Resouces Left and After Deployment Settled
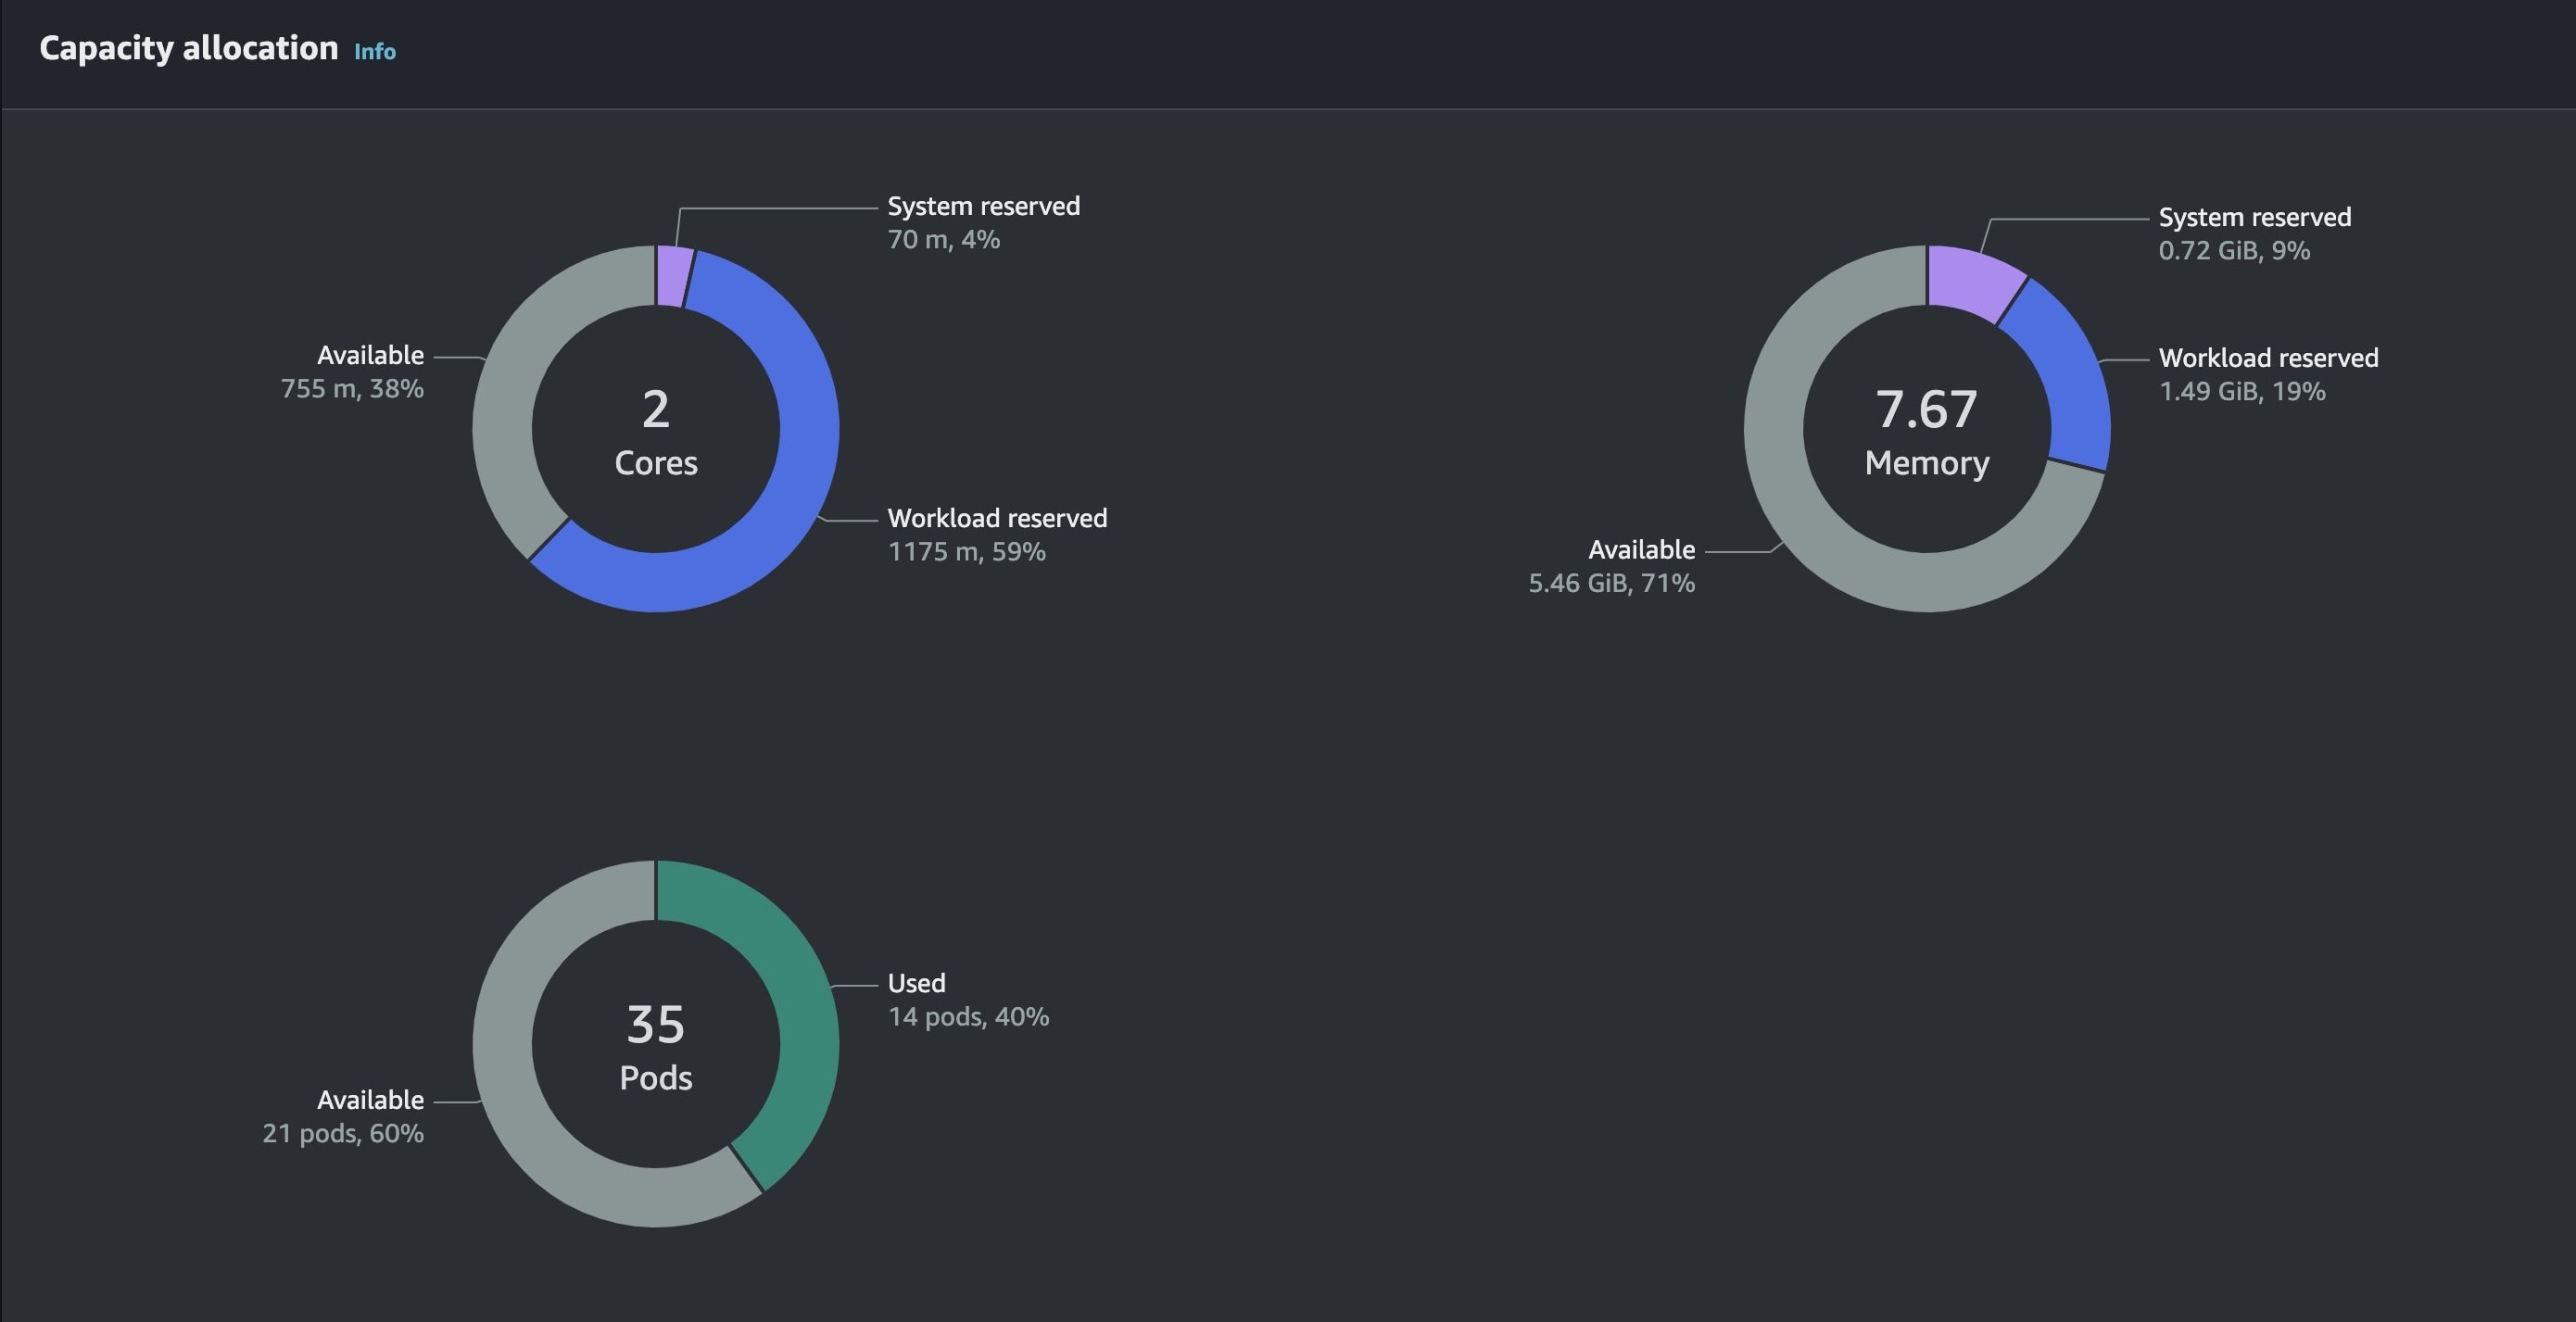
t3.large Second Node Created Manually Having Much Resouces Left and After Deployment Settled
I hope you've learned something useful from this blog to take home for your cluster autoscaling and better deployment management using Karpenter.
Till next time 🤞🏽